 1. Introduction
Thank you for purchasing Bandtheme – a WordPress theme for musicians, bands, managers and record labels. We have compiled this document to guide you through the set-up process and to outline some of Bandtheme’s powerful features.
We have designed Bandtheme to be user-friendly and adaptable so that you can achieve the perfect result for your website. The features include image galleries, video & music streaming, live dates and many more.
We hope you enjoy using Bandtheme.
Look out for tips in the guide!
Not all sections may be relevant to you as Bandtheme is designed for everyone from first time WordPress users to seasoned developers.
WordPress themes by default only offer the tools to create a site, rather than the finished article (think of it like bricks, instead of a finished house). We have hand crafted some beautiful examples to get first time users started with a one-click import.
2. Installation
Bandtheme is built on the WordPress platform. This section will guide you through the steps required to install WordPress and your theme before you begin adding content to your website.
If you have purchased installation or our hosting and theme bundle you can skip this step.
Before you begin, we recommend you have:
☑️ Hosting – this is where your website will live and all your content is stored.
☑️ Domain Name – the address people type to view your website, for example www.your-band-name.com.
☑️ WordPress – you will need a working version of WordPress before you can install Bandtheme.
If you are looking to register a domain, we would recommend 123-Reg.
Hosting
WordPress requires the following:
- PHP version 7.4 or greater.
- MySQL version 5.6 or greater, OR MariaDB version 10.1 or greater.
- HTTPS support
More details can be found here.
If you are purchasing your own hosting, don’t just go for the cheapest option out there! Make sure your host supports running WordPress and fast load times. No one likes a slow website!
If in doubt, we offer a word-class, super-fast green web hosting service and optional installation if required.
Theme Installation
This step guides you through installing Bandtheme to your WordPress website.
To install Bandtheme:
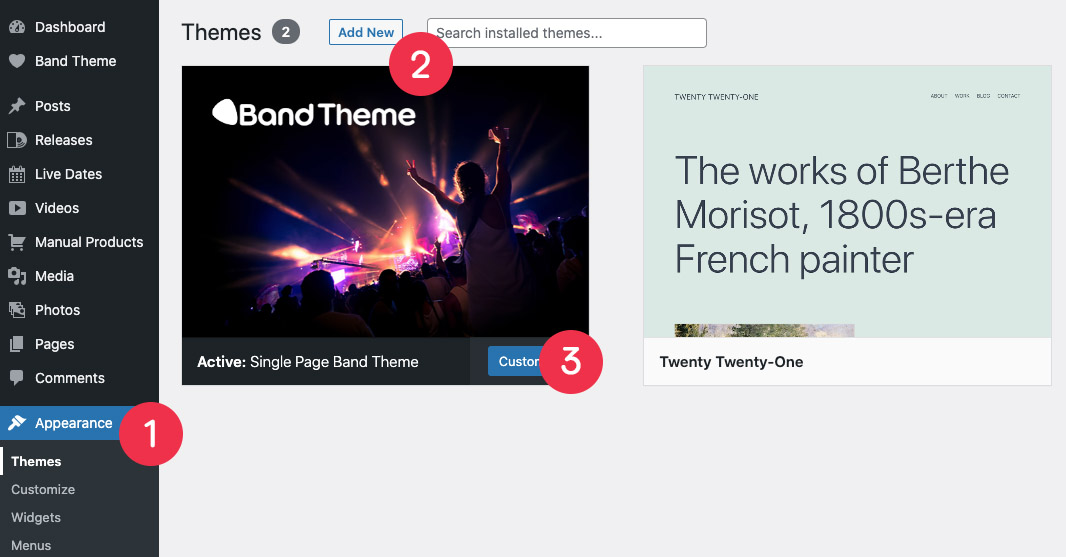
- Login to your WordPress admin panel. Please navigate to Appearance → Themes. Here you will find the default theme or any existing WordPress themes you may have installed previously.
- Click Add New at the top-left of the page. Once the page loads, click Upload Theme
- Please go to the folder where your bandtheme.zip file is located (*please use the zip file – do not extract the files first). The Bandtheme zip is included in the files that you downloaded when purchasing. Please select the zip file and click “Install Now“
- When the bandtheme.zip file is uploaded and installed please click Activate in order to set Bandtheme as your theme
Developer? If you’re looking to dive deeper into editing the Bandtheme code, we would recommend using the Child Theme so any changes you make to the code are not lost during a future update. Find out more about Child Themes here.
Please note if you are switching to a Child Theme, you will need to re-add any styling added via the Customizer.
Please do not unzip the “bandtheme.zip” folder. If you try installing the entire unzipped theme package or another incorrect file, you will receive this error message:
“The package could not be installed. The theme is missing the style.css stylesheet. Theme install failed.”
If you receive this error message, please ensure that you’re installing the ZIPPED file titled “bandtheme.zip”.
If you are seeing one of the following error messages:
"The link you followed has expired"
or
"The uploaded file exceeds the upload_max_filesize directive in php.ini"
after uploading, this is most likely due to your host limiting the maximum file upload size. To resolve this, either manually upload your theme via FTP or copy and paste the following code to your .htaccess file.
php_value upload_max_filesize 64M
php_value post_max_size 64M
php_value max_execution_time 300
php_value max_input_time 300
You may need to speak with your hosting provider in order to do this.
You can check your max upload size by opening the WordPress dashboard and go to Media → Add New.

Plugins Installation
A plugin is a piece of software that can extend functionality or add new features to your WordPress website. There are some key plugins integrated with Bandtheme. We have also suggested some useful optional plugins in Optional Extras and the Tips section of this guide for advanced users.
You will be prompted to install the following plugins with the theme to get you started:
- One Click Demo Import
- Simple Page Ordering (to enable easy drag and drop re-ordering of content)
- Bands In Town
Simply click Begin installing plugins → Check all boxes → Bulk Actions → Install → Apply

After activating the theme we recommend installing the below plugins. These are optional, but will help with the smooth running of your site and give you extra functionality and performance.
To install plugins…
- In the left-hand menu, click Plugins.
- Then, in the top-left corner, click Add New and then in the text box (top-right), type in the name of the plugin.
- Then select the correct plugin, click Install Now and then Activate.
If you are creating an e-commerce site, you may require WooCommerce.
Alternatively, Bandtheme allows you to add custom products which link externally to a retailer if you do not wish to use it.
3. Activating Your Theme
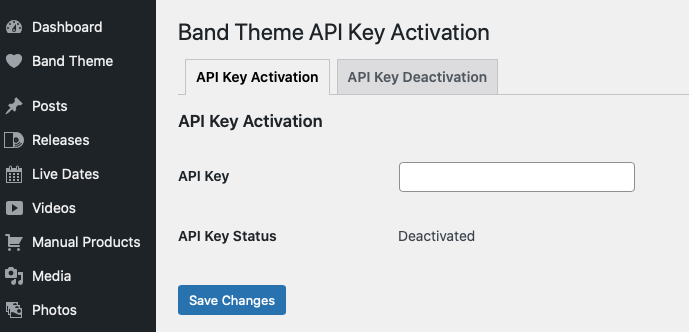
When you purchase your theme, you will be given an API Key. This enables you to activate your theme, get access to support and theme updates.
You can only use your key on one theme. If you have multiple sites, you must purchase a new theme/key.
If you are a developer and trying to install Bandtheme on localhost, the activation may be blocked by your firewall. If this is the case, just remember to activate once you set the site live.
Remember you can always download the latest version of Bandtheme from your account area and update manually.
Problems validating your key? Try deleting it from the box, re-add and Save again.
Where Are My API Keys?
You can find your API License Keys on your welcome email when you made your purchase, or in your account area.
Click Login to your Bandtheme My Account area → click API Keys to view.
Where Do I Add Keys?
In your WordPress admin area, click Settings → Activation to enter you license key to activate your theme.
4. Choose Your Design
Importing Bandtheme demo content is optional, but advised if you’re a first time user. It will give you some content (pages, posts, base styles etc) to base your site around and provide you with a strong starting point.
Chances are you purchased Bandtheme after seeing one of the theme demos, and so purchased with a particular theme demo in mind. At this stage, you only have the blank theme installed, so unless you want to start with a completely clean slate, we strongly recommend installing a theme demo. You’ll be able to select the one you had your eye on or go for something completely different.
If you are importing a demo, you will then need to edit the content and replace it with your own but this is a quick way to get started.
If you’re having issues importing multiple demos, try deleting all your old pages (and removing them from the Trash) to start from a clean slate. We also offer an installation service. Please see our website for more details.
Importing Bundled Presets
We recommend that you start with a fresh WordPress installation to get the best results after importing the Bandtheme demo file.
Before importing, make sure you have installed the Theme and recommended Plugins. Also, please ensure that you have installed the One Click Demo Import plugin.
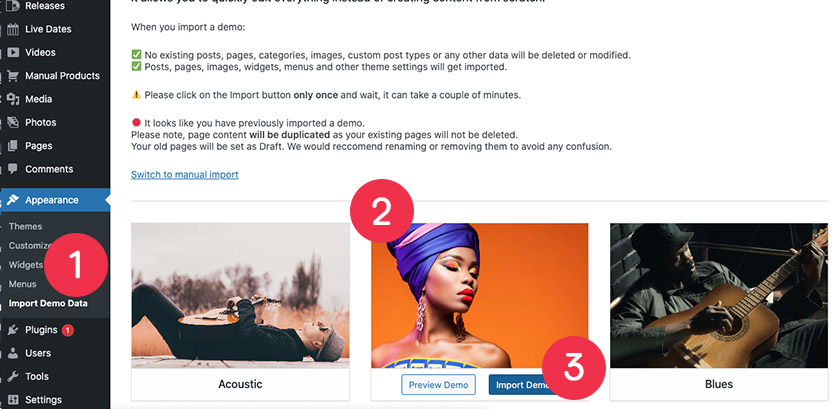
- Navigate to Bandtheme and click import or Appearance → Import Demo Data
- Select the demo you wish to import from the list
- Click Import Demo
- Next you will be prompted again to install any recommended plugins. Please refer to Plugin Installation for more details.
- Click Continue & Import to begin the install.
- Please only click this once and be patient – it can take a few minutes.

It is possible to import more than one demo. Please note that your original content will not be deleted and therefore duplicated. Your old pages will be saved as Draft. It is recommended that you rename or delete any old pages prior to setting your site live for performance, and to avoid any confusion.
WordPress has a built in function to select and bulk delete multiple items at once to save time!
If you’re having issues importing multiple demos, try deleting all your old pages (and removing them from the Trash) to start from a clean slate. We also offer an installation service. Please see our website for more details.
If you can’t see any presets to import, make sure you have activated your license first!
Importing Manually
If you want to manually import demo files from a backup, or if you have purchased a limited edition design, Navigate to Appearance → Import Demo Data and click Switch to Manual Import.
Follow the on screen instructions for importing your files.
The import rules will apply in the same way as importing a bundled demo.
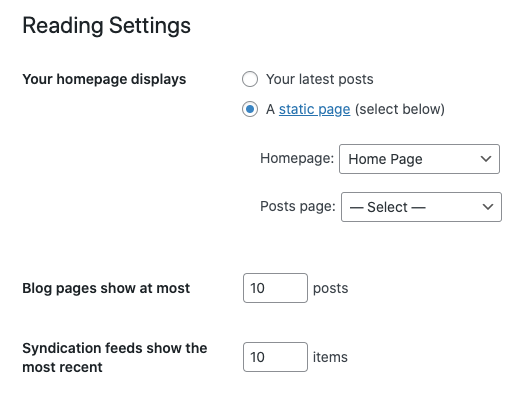
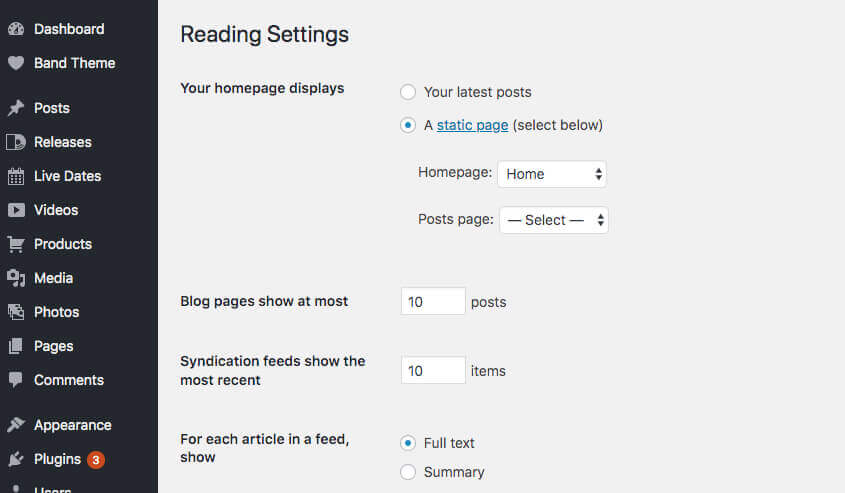
If you can’t view your site and the “Coming Soon” page is showing make sure you go to Settings > Reading > Home Page and make sure this is set to your Home Page.
5. Pick Your Sections
Introduction to Pockets
Bandtheme allows you to create and style the pockets of content throughout your site. You can then drag and drop the pockets to re-arrange the content at any time.
Once you have edited the pockets, you will need to click Update on the right-hand side of the page.
If you have imported a demo, these will be set up for you!
You can jump in and easily switch in your own content, reorder pockets, switch layouts or even completely change the design on each individual pocket.
Available Pockets
There is a wide range of content pockets to choose from. We have listed these below. Details on the various options for each pocket are discussed within their own section of this document, which are linked to below.
- Top Pocket – Manual – Details here
- Top Pocket – Revolution Slider – Details here
- News Pocket – Details here
- Releases Pocket – Details here
- Photos Pocket – Details here
- Full-Width Image Pocket – Details here
- Videos Pocket – Details here
- Merchandise Pocket – Details here
- Live Dates Pocket – Details here
- Text Pocket – Details here
- Music Player Pocket – Details here
- Newsletter Signup Pocket – Details here
- Press Reviews Pocket – Details here
- Instagram Pocket – Details here
- Socials Pocket – Details here
- Promo Pocket – Details here
Adding Pockets
To create the pockets of content for your site:
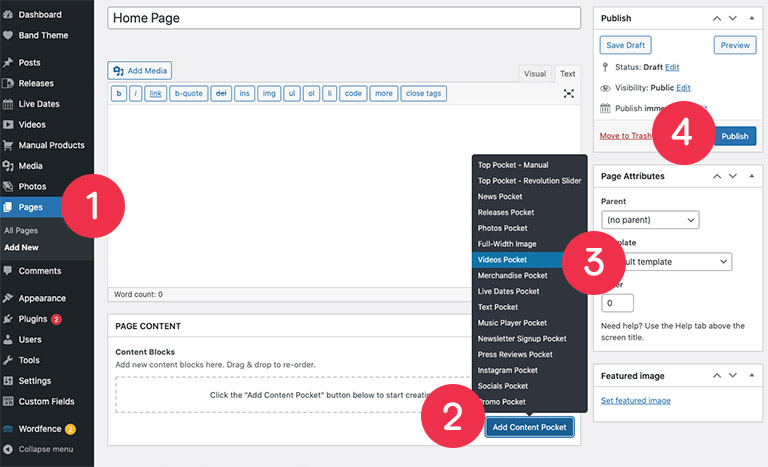
- In WordPress, navigate to Pages → Home Page (if already created)
- Scroll down to the section labelled PAGE CONTENT and click Add Content Pocket
- Click the pocket type you wish to add from the list and add your content and choose from the available layout and styling options
- Click Publish
Pocket Structure
Pockets are split into tabs, including:
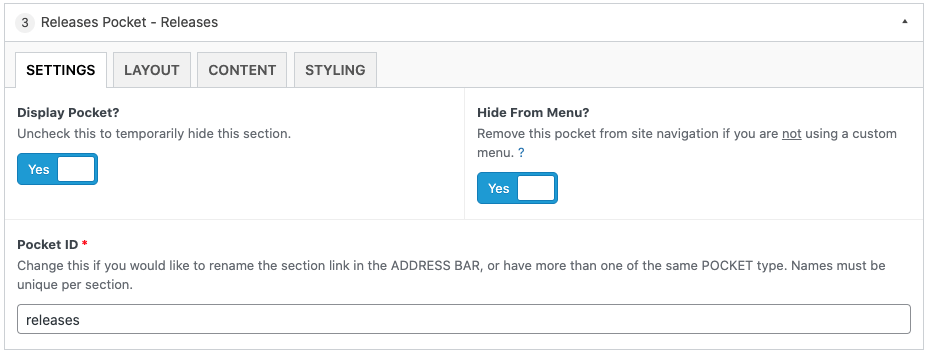
- SETTINGS – here you can decide to hide the pocket and give the pocket a unique ID
- LAYOUT – options on how the pocket will be formatted, e.g. in a grid or slider
- CONTENT – the content to be displayed, e.g. choosing products, galleries or text to be displayed
- STYLING – unique styles such as text colour or background image
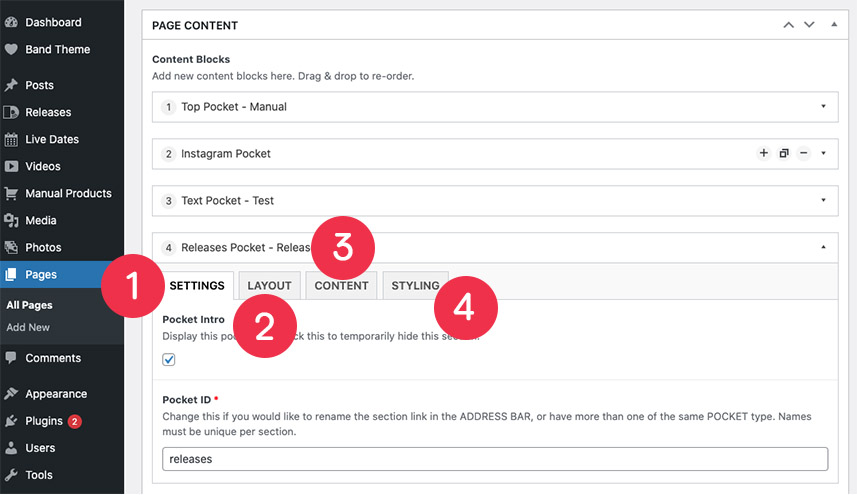
Hiding Pockets
It is possible to create a pocket of content but only switch it live at a later date.
In order to do this, navigate to the pocket in question and you will see the checkbox labelled “Display this pocket? Uncheck this to temporarily hide this section”.
Simply toggle this off to hide the pocket and then click Update.

6. Adding Content
Content can be added to your website in several places including:
- Pages for example the Home Page
- Blog pages
- Pockets (sections WITHIN a page)
- Elsewhere, such as the global customiser or in SEO settings
Below we will go in to the main areas in more detail.
If you can’t view your Home Page or see any content on it, you must make sure it is not set to Draft or Private.
You must also make sure you have actually set a Home Page. To check this, click Settings → Reading and make sure Home Page is set as your correct page.
Importing Existing Content
This section covers importing content from an existing website.
If you have already imported a demo, or want to add content manually you can skip this section.
If you are looking for details on how to import one of the Bandtheme demo presets, please refer to the Importing Bundled Presets section.
If you have an existing website it may be possible to import some of your old content, especially if the website is already built in WordPress. While Bandtheme does not support importing from all sources, we will cover some common basic scenarios below.
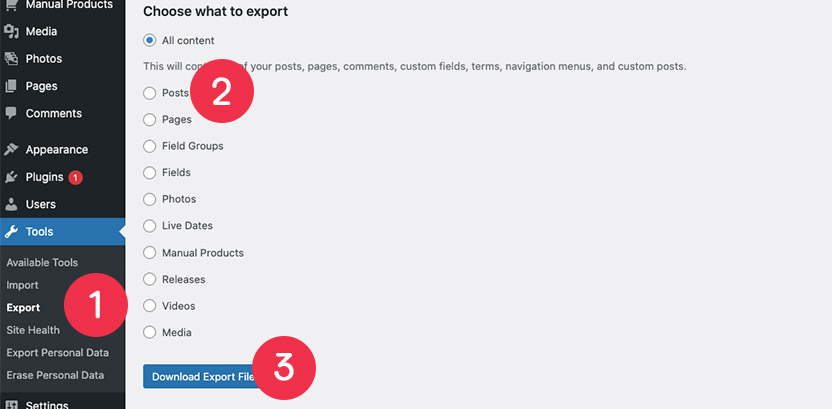
To export from an existing WordPress website:
- Login to your old site and click Tools → Export.
- Select the content you wish to export. Posts (Blog articles) are the most common. Other post types are not supported.
- Click Download and save your file.
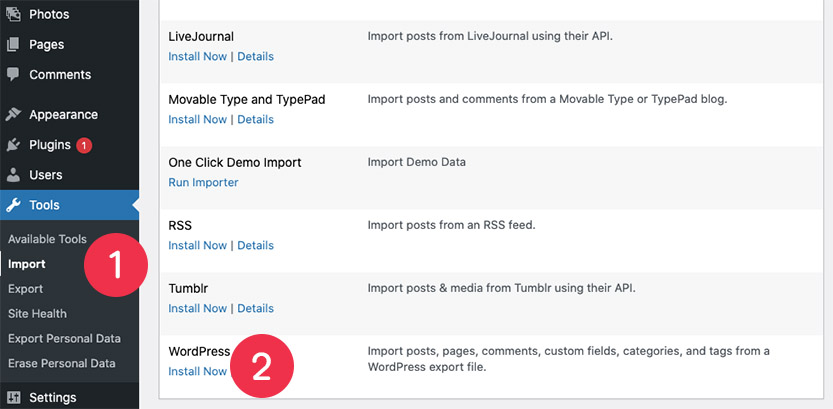
To import to Bandtheme:
- Login to your new site and click Tools → Import.
- Click Install Now next to the WordPress option.
- Once installed click the Run Importer prompt and upload the export file you have just created and follow the on-screen prompts.
If your site is not already in WordPress you can contact us for a quote to help importing.
Images not importing? This may depend on your old site server. You may be able to use this Auto Upload plugin to help but please note it is not officially supported by Bandtheme.
Adding Pockets
Pockets are a key element of Bandtheme. They are “blocks” or rows on your site containing each piece of content.
Please refer to the Editing Pockets for more details on adding and editing each specific pocket.
Blogs (aka. Posts)
‘Posts’ is the WordPress term for news or blog pages. Posts can be created and then displayed in the style of your choice in the News pocket of your website.
Creating A Post
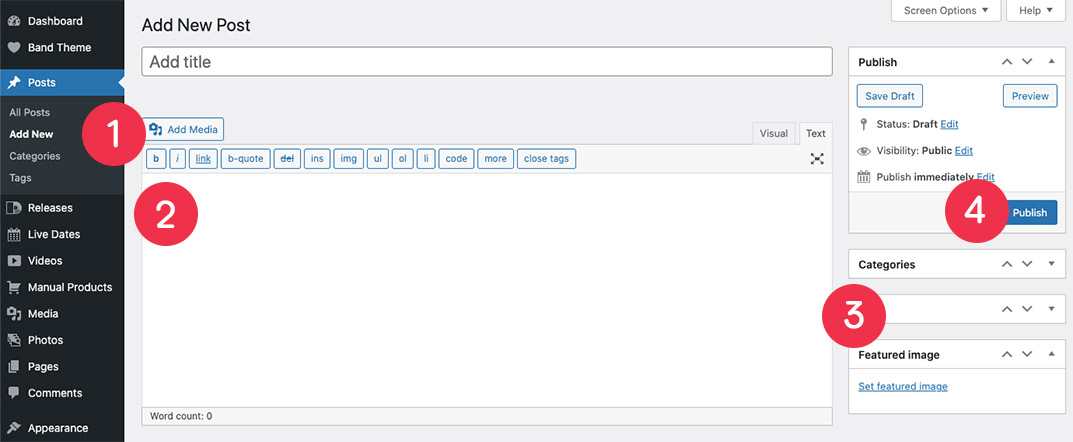
To create a new post:
- In the WordPress admin panel, navigate to Posts → Add New.
- Add your post title, content
- Add a Featured image.
- Once you have completed your post, remember to click Publish.
If you’re not able to link to your posts when clicking on them, see a “404” error or “This page could not be found message, you may need to re-save your permalinks.
To do this, just click Settings → Permalinks → Save Changes.
Adding Posts To Your Page
Posts will be displayed in the News pocket where you can decide how they are displayed and formatted.
If you have imported a demo, this will be set up automatically for you.
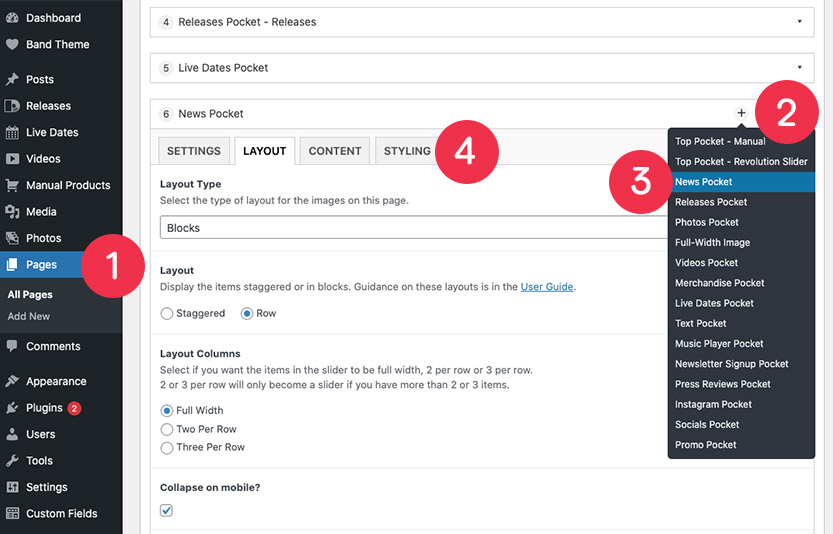
To add a News pocket or edit an existing one:
- In the WordPress admin panel and navigate to Pages → Home Page (if already created).
- Scroll down to the section labelled PAGE CONTENT and click Add Content Pocket.
- Click News Pocket
- Enter the details required on the LAYOUT, CONTENT and STYLING tabs.
Post Layouts
Posts can be laid out in a number of ways in the News pocket – in blocks, staggered blocks and sliders.
You can also adjust the number of posts to display in each row.
Releases
This section explains how to add Releases to your website.
Adding Releases
- To add Releases, navigate to Releases → Add New
- Add the album artwork, streaming links, embeds and add any store links
- Add the category of the release (Compilation, Album, Live etc). This will display below the album artwork on the front-end of the website
- Click Publish (or Update if editing)
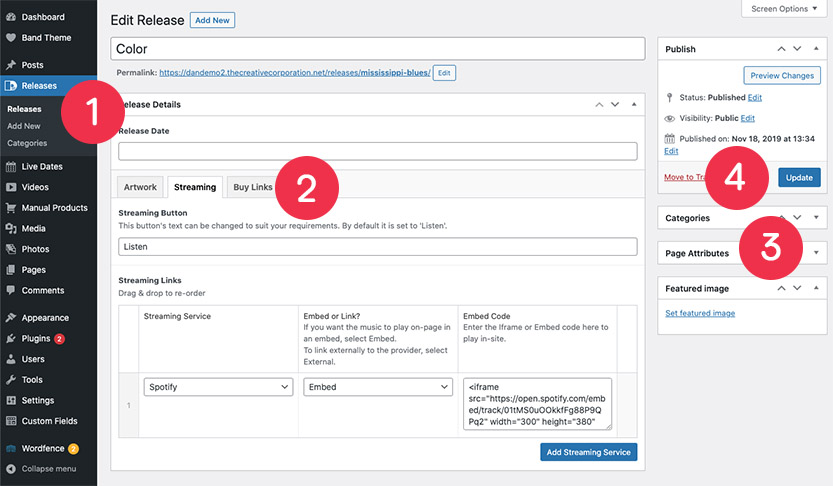
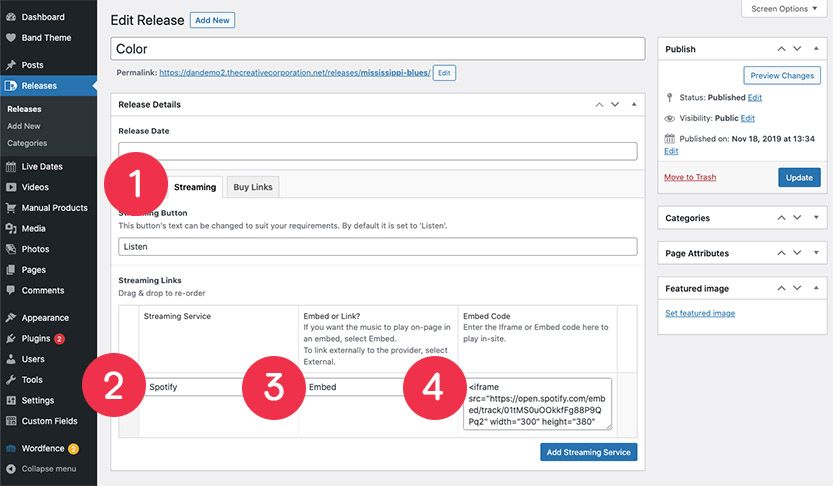
Streaming Links
To add Streaming links to a Release:
- Click the ‘Streaming’ tab
- Select a Streaming Service (e.g. Spotify) from the dropdown
- Select whether you want to add an Embed or a Link from the dropdown
- Enter the embed code or the link.
- Click Publish when you are done.
To add another streaming service click the ‘Add Streaming Service’ button. You can then drag and drop these if you wish to re-order them.
We recommend using embed codes if they are available for your streaming provider. They keep users your on your website, while still counting towards to your stream plays!
Adding Embed Code
Bandtheme allows you to add embeds from external providers.
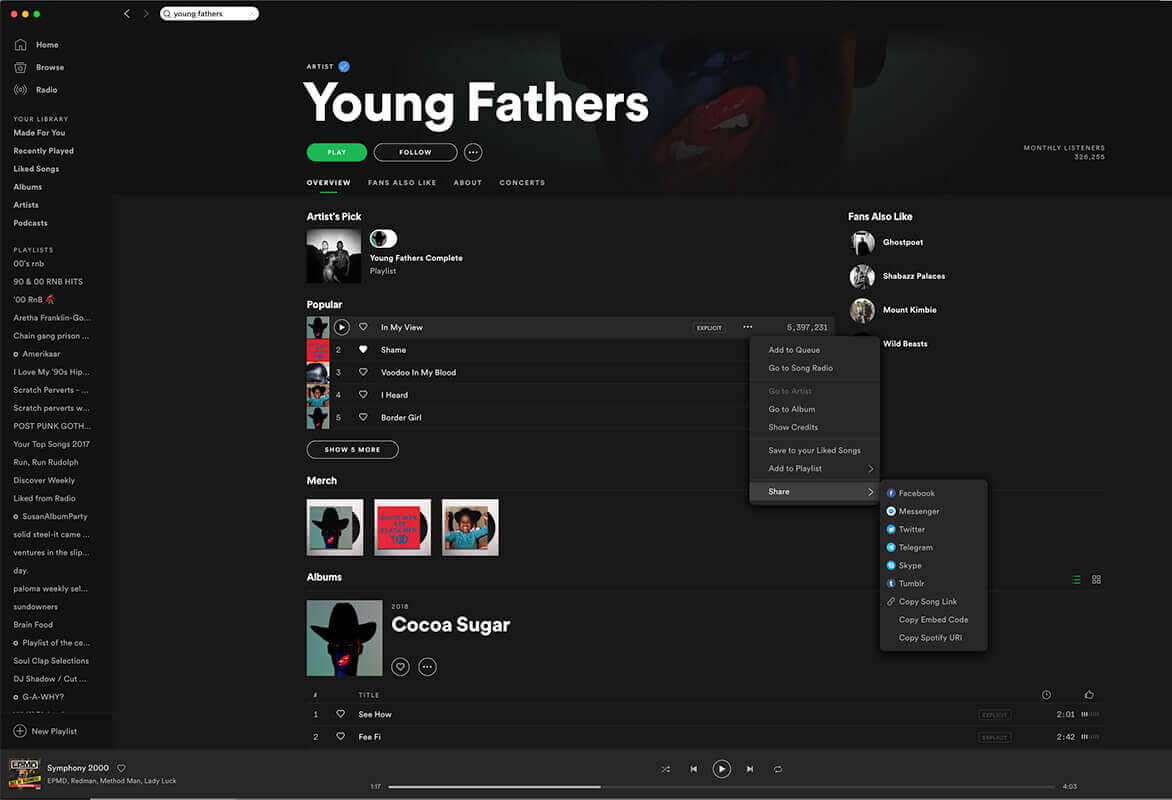
To add a Spotify embed, click the Options button (3 dots next to a song title) → Share → Copy Embed Code.
Then paste the code in the ‘Embed Code’ text area within your Release. This will add an embedded Spotify player to the Release. For other streaming services, the process is similar and will produce an embed from the provider.
Bandtheme supports any provider with embed code.
Here are some useful links on where to find your code for common providers:
Adding Streaming Links
To add a streaming link – e.g. from Spotify, click the options (3 dots) button → Share → Copy Album Link.
Then paste the code in the ‘External Link’ text area. This will add a link to the Release and will link out to Spotify. For other streaming services, the process is similar and will link out to the provider.
Don’t want to spend time managing lots of links?
You can add SMART URLs such a Linkfire or your favourite Smart URL service here and let your visitor decide which service to use.
Hiding Releases
All the releases will display in the Releases pocket, where you can choose how they are displayed on the site.
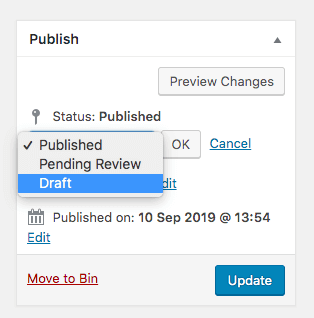
If you wish to temporarily hide a release, navigate to Releases, then click the relevant Release, and change the status of the release to Draft on the right-hand side, then click Update. It will not display on the site until it is changed to Published.
Re-ordering Releases
We recommend installing the Simple Page Ordering plugin. This will enable you to re-order the Releases in the list.
- In the WordPress menu click Releases
- Hover on a Release
- When the cross cursor appears, drag and drop the videos to re-arrange
- They will then automatically be saved in the new order
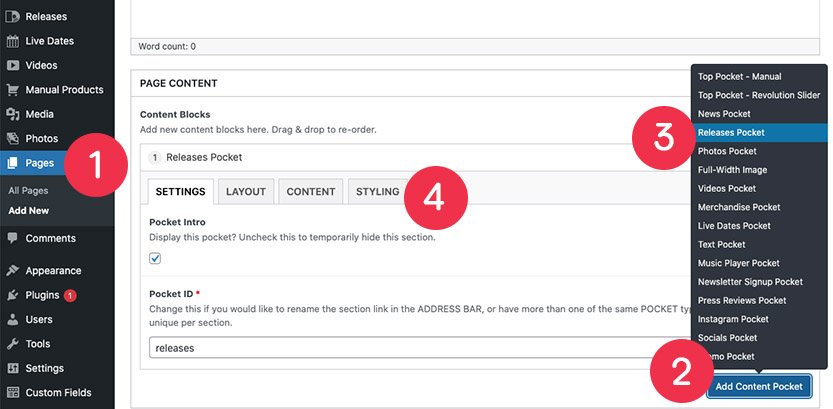
Adding A Release Pocket
All the releases will display in the Releases pocket, where you can choose how they are displayed on the site.
- Navigate to Pages → Home Page
- Scroll down to the section labelled PAGE CONTENT and click Add Content Pocket
- Click the Releases Pocket
- Choose how you want the Releases pocket to display from the available options
- Click Publish
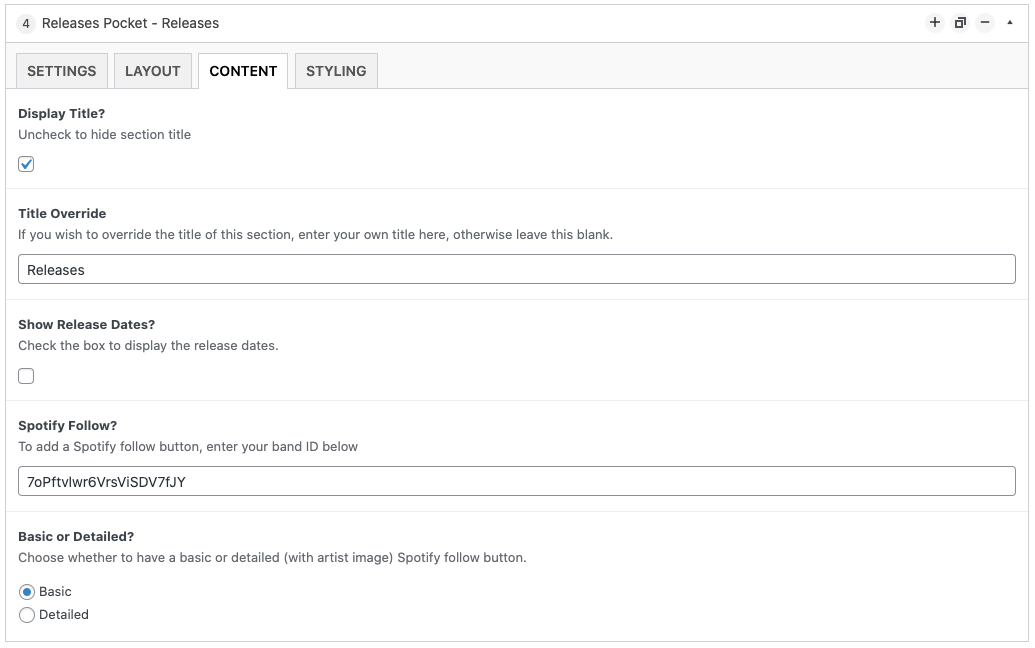
Spotify Follow Button
Bandtheme allows you to connect with your fans by adding a Spotify Follow button. You will need to add your Spotify artist/band ID in the ‘Spotify Follow?’ area. This is located in your Releases pocket, within the CONTENT tab.
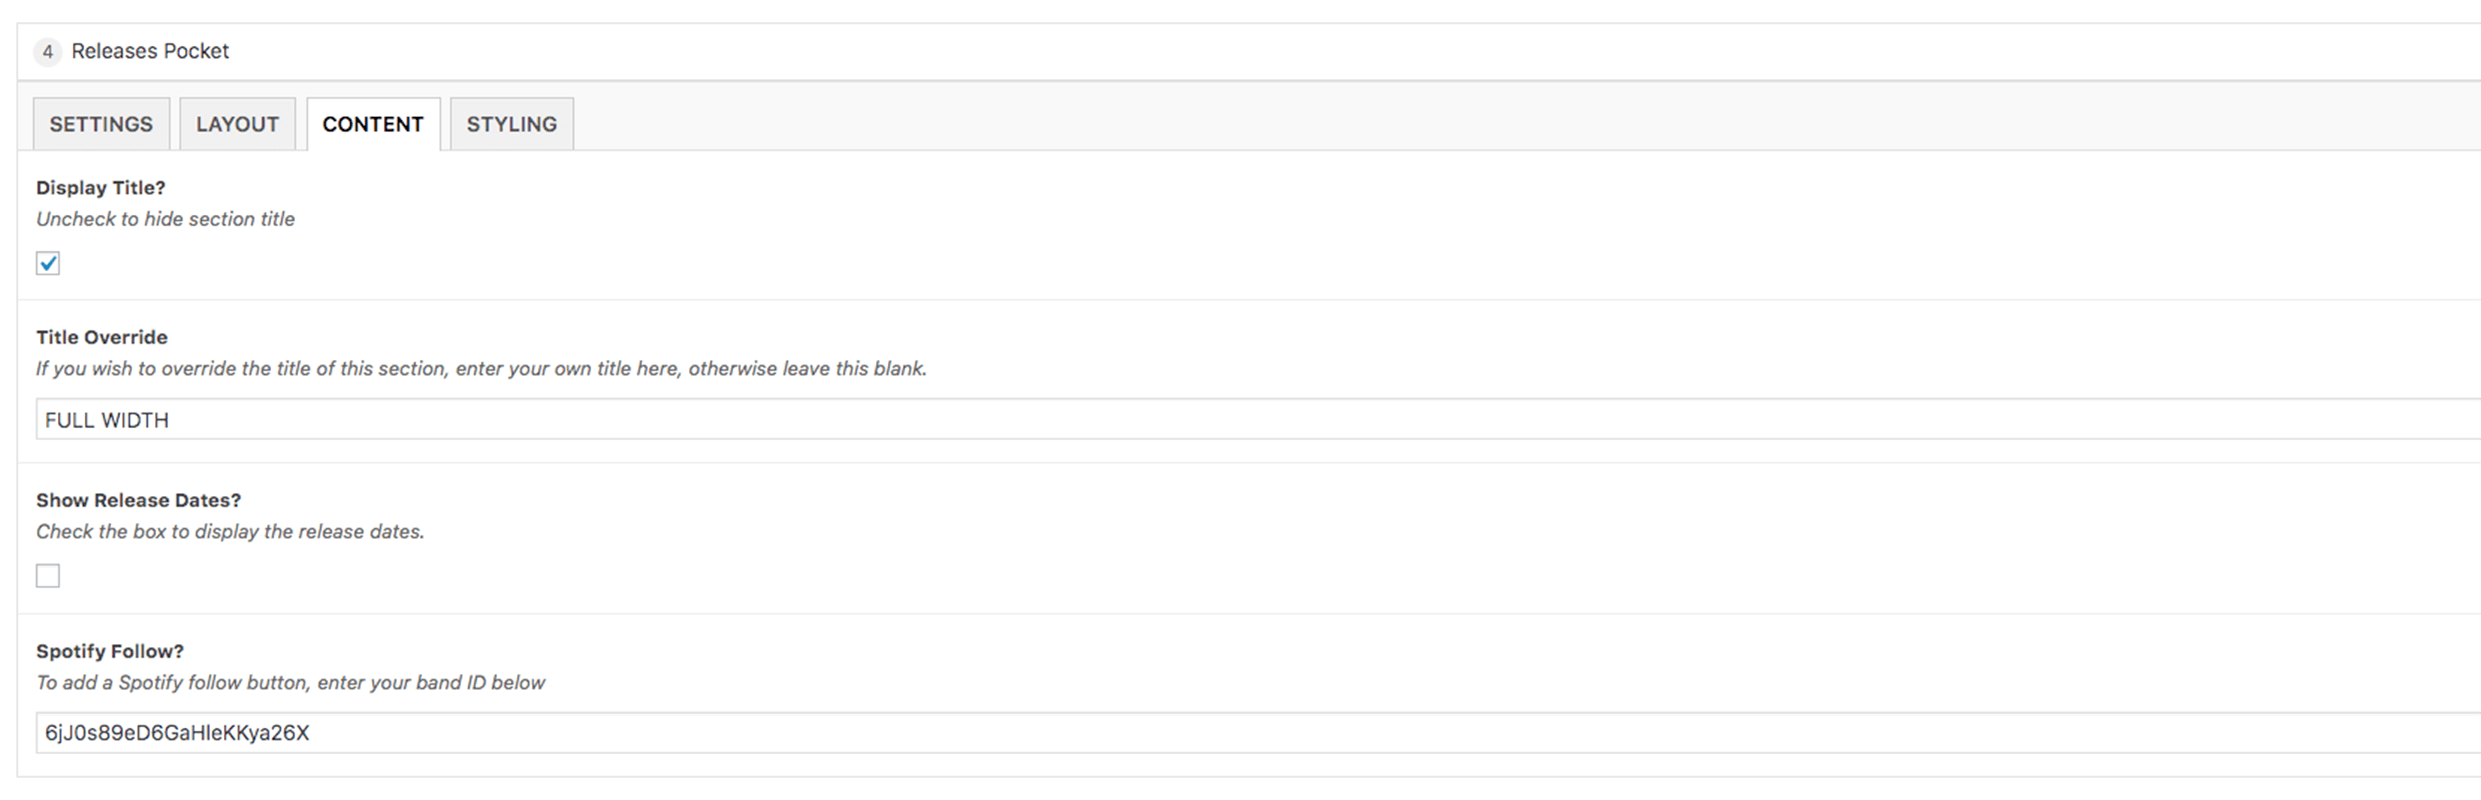
In order to get your band ID:
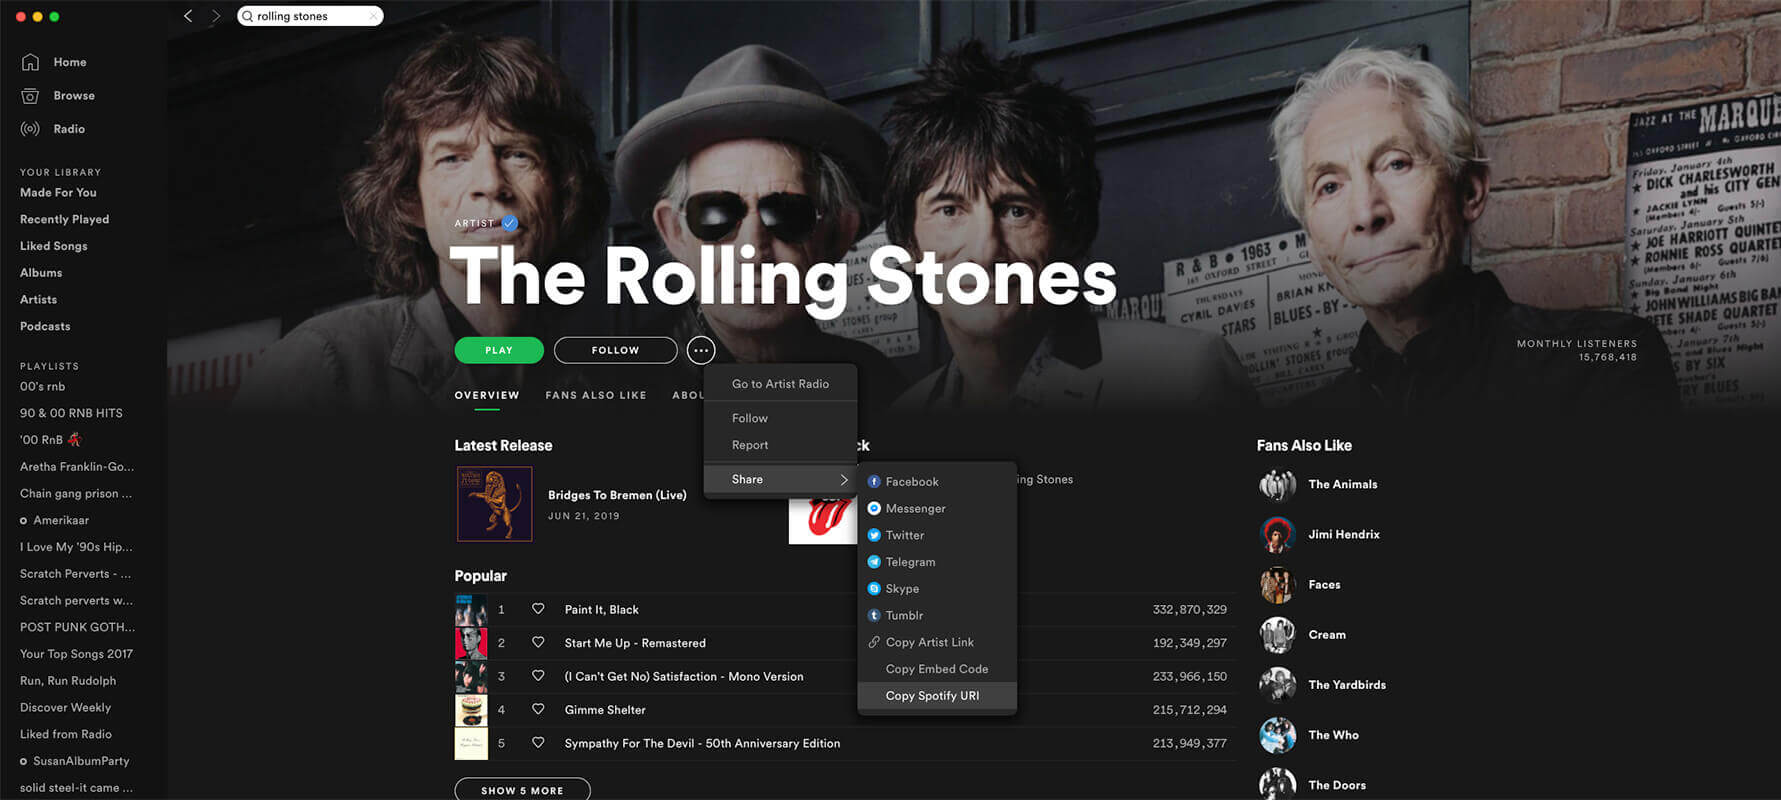
- Open Spotify and search for your band/artist page
- Next to your band/artist name, click the three dots (…) button
- Navigate to Share → Copy Spotify URI
- Copy the digits at the end, for example the digits ate the end of the below:
spotify:artist:5mZC7ndY6oGMxJentRwsuV - Add this to the Spotify Follow? area
Spotify button not working? Spotify discontinued support for their official widget button. Make sure you update to the latest version of Bandtheme to fix your button.
Live Dates
You can add Live Dates to Bandtheme by manually adding your own dates or by using external providers. Both methods are detailed below.
Manual
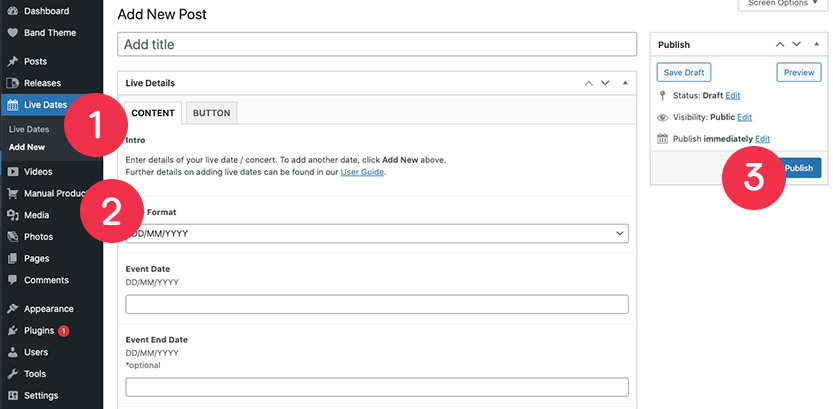
To manually add Live Dates to your site:
- In WordPress, navigate to Live Dates → Add New
- Add all the relevant details for each live date: Venue, Date, Location and Ticket Links
- Click Publish
You will need to add a Live Dates pocket in order to display live dates on your website.
Can’t see all your live dates?
Check your dates haven’t already passed.
Ensure that you have enabled WordPress to show all your posts. In order to edit the amount of posts that WordPress shows, navigate to Settings > Reading and then edit the ‘Blog pages show at most’ option.
The number of live dates shown can then be updated from within – Live Dates pocket > Content > Limit?
If you are using a cache plugin, please also make sure you have cleared your cache.
External
Once you have added a Live Dates pocket to your page, you can add your live dates through an external provider:
- Bands In Town
- Songkick
Enter the details for your live dates provider and click Update. Fore more details please see editing the Live Dates Pocket.
Videos
Bandtheme allows you to add videos on your site, streamed via YouTube. All the videos will display in the Videos pocket, where you can choose how they are displayed on the site.
Adding Videos
- In WordPress, navigate to Videos → Add New
- Add all the relevant details for each video
- Click Publish
These will be displayed in the Videos pocket, where you can decide on the layout.
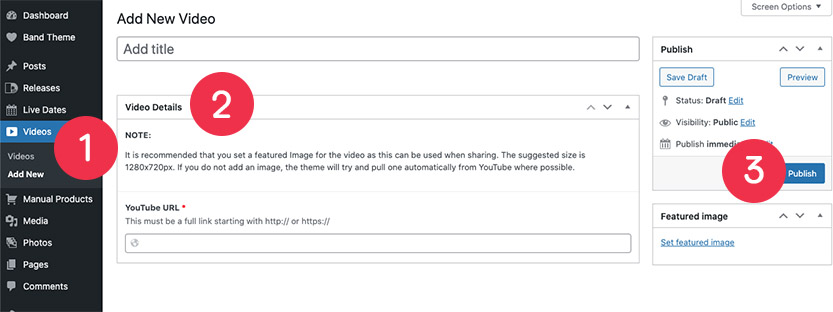
Video thumbnails will be pulled from YouTube where possible HOWEVER it is recommended that you manually add them. When you have a lot of videos, pulling images from YouTube it can cause a noticeable performance decrease.
Images should be 1280x720px.
Hiding Video
To hide a video:
- Navigate to Videos and select the relevant video.
- Change the status of the Video to Draft (it will not display on the site until it is changed to Published)
- Click Update
Alternatively, select the Selection option from All videos or selection? in your Videos pocket.
Re-ordering Videos
We recommend installing the Simple Page Ordering plugin. This will enable you to re-order the videos in the list.
- In the WordPress menu click Videos
- Hover on a Video
- When the cross cursor appears, drag and drop the videos to re-arrange
- They will then automatically be saved in the new order
YouTube Follow Button
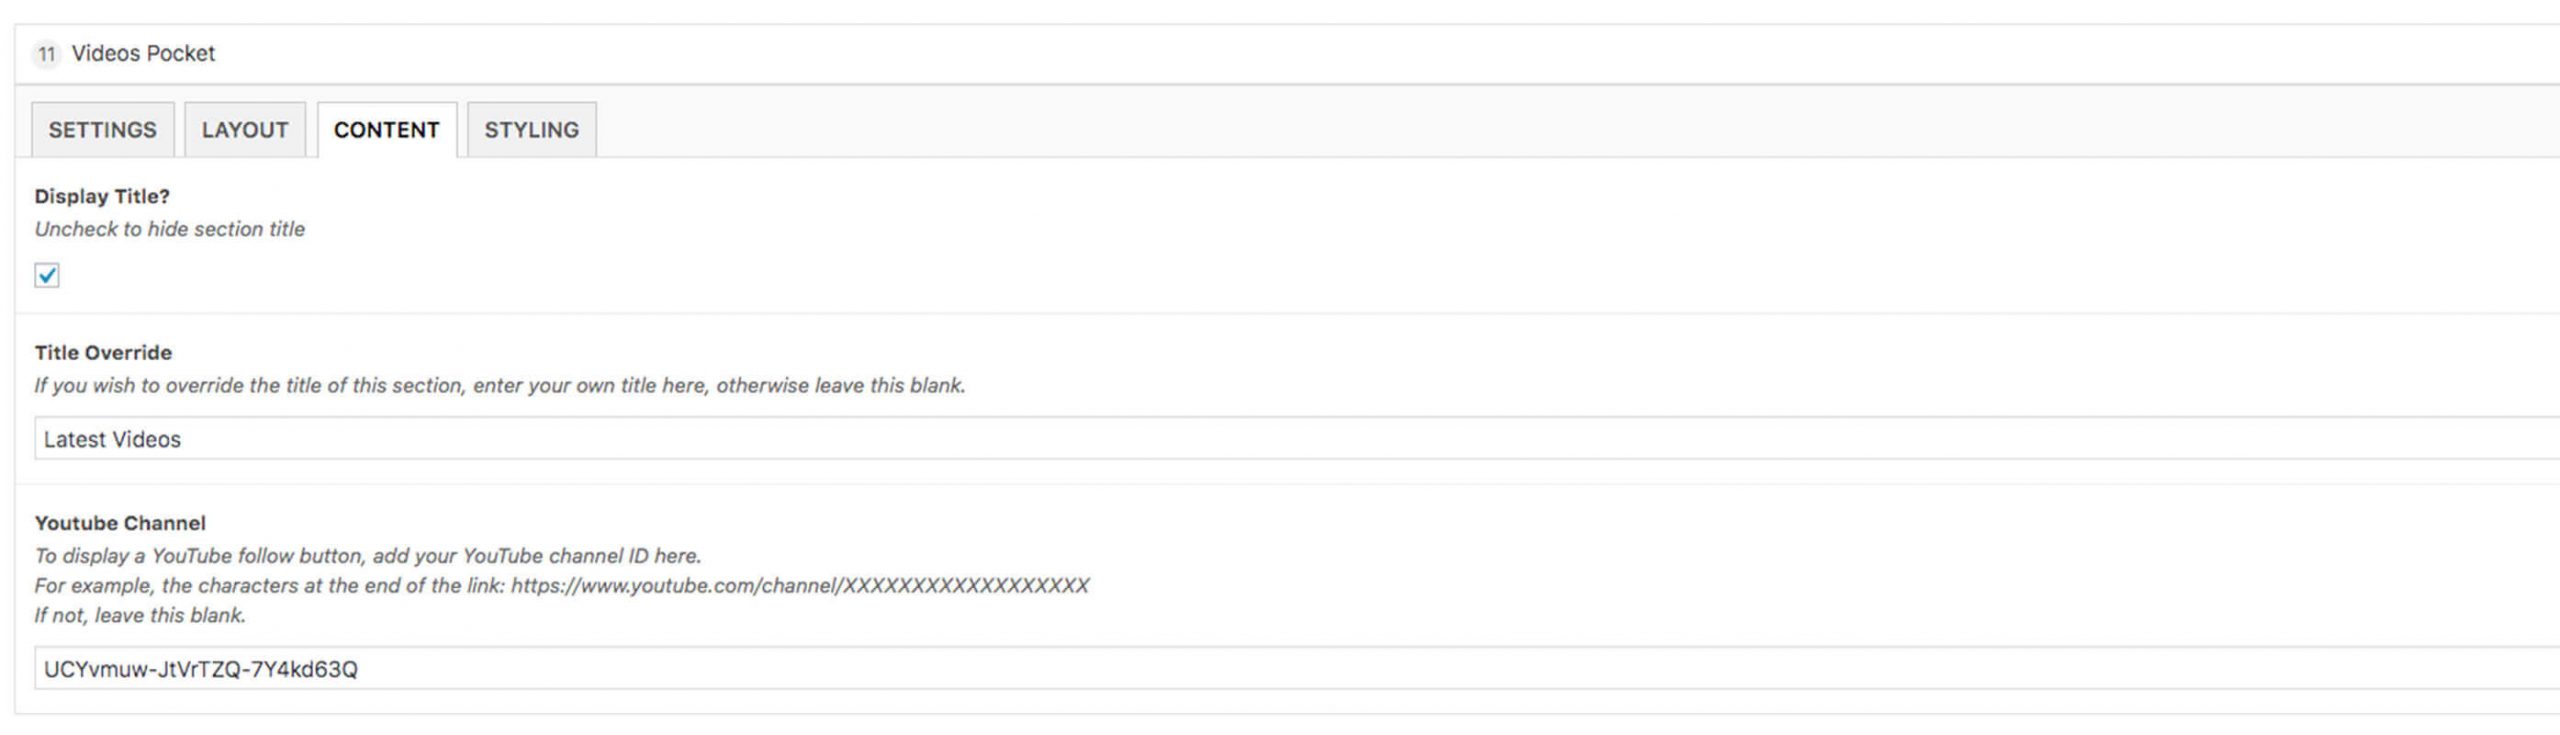
Bandtheme allows you to connect with your fans by adding a YouTube Follow button. To display a YouTube follow button, add your YouTube channel ID in the ‘YouTube Channel’ area. This is located in your Videos pocket, within the CONTENT tab. For example, the characters at the end of the link would represent your YouTube channel ID:
https://www.youtube.com/channel/XXXXXXXXXXXXXXXXXX
For more information on getting your ID, click HERE.
Photos
The Photos pocket allows you to display single images or galleries.
Before uploading any images to Bandtheme, please ensure they are properly compressed. This reduces the file size and will help your site’s load times whilst decreasing the pressure on your server.
To display your photos and galleries you will need to add a Photos pocket to your site.
To create a photo gallery:
- In WordPress, navigate to Photos → Add New
- Add title
- Add Images (drag & drop to re-order)
- Click Publish

The gallery will be available to select in the Photos pocket where you can decide on the layout.
Alternatively, you can create a gallery directly in the Photos pocket by unchecking the ‘Existing Gallery?’ box and adding your photos.
We recommend two methods for compressing images:
- Photoshop – When saving an image, click the ‘Save for Web’ option.
- Tiny JPG (tinyjpg.com) – This site allows you to upload an image for compressing and then download the compressed image. It is extremely easy and fast, and is ideal for those with less knowledge of Photoshop.
Images don’t need to be sized specifically as they will be cropped or resized as required. However, for performance, we recommend images are no bigger than 2000px wide.
Products
There are two ways to add Products to Bandtheme – Manually or through WooCommerce.
Manual Products
- In WordPress, navigate to Manual Products → Add New
- Add all the relevant details for each product including the featured image, price and a link to the store
- Click Publish
- Navigate to your page and add a Merchandise pocket. Here you can decide the layout and choose which products to display.
To re-order we recommend installing the Simple Page Ordering plugin. This will enable you to re-order the Manual Products in the list.
- In the WordPress menu click Manual Products
- Hover on a Manual Product
- When the cross cursor appears, drag and drop the videos to re-arrange
- They will then automatically be saved in the new order
Don’t forget to add products to the page pocket after you have created the actual product!
Woocommerce Products
To activate WooCommerce, install and activate the free WooCommerce plugin by navigating to Plugins → Add New.
If you have already set up a WooCommerce store, you can select the WooCommerce option in Store Type (in the Merchandise pocket).
Once you have followed the WooCommerce set up, you can add products under Products → Add New.
For more information on WooCommerce, here are some useful links:
- WooCommerce Overview
- WooCommerce Documentation
- WooCommerce Video Tutorials – Scroll to “Installing WooCommerce” and choose a tutorial.
Tracking
If you would like to add analytics, tracking or pixels to Bandtheme, you can do this in the Customizer.
Please refer to the Analytics section for more details.
7. Editing
As well as editing all your content, Bandtheme lets you highly customise the design and layout of your site too.
You have control over Global settings such as general fonts, colours and menus, but also at a much more granular level to change the layout and styling of each pocket on a page.
Developer? If you’re looking to edit the Bandtheme code, we would recommend working with the Child Theme. We also recommend installing PrePros to compile .LESS and .JS files. It is free and the config files are included – just drag and drop your theme in to get started.
Global Theme Settings
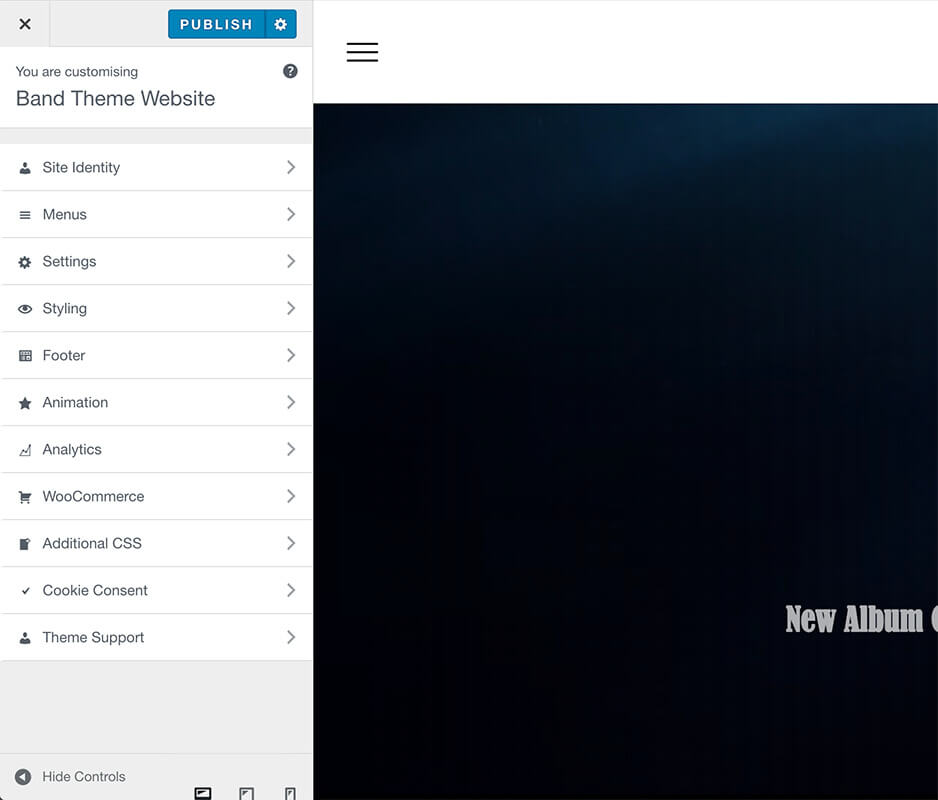
Bandtheme is fully customisable so that you can achieve a unique look and feel for your website. We have built upon the existing WordPress Customiser to give you complete control of how your site looks.
Edit the appearance of the site using the options on the left-hand side and see the changes on-screen. This allows you to make changes without affecting the live website. In order to save the changes, click Publish and they will be set live.
Navigate to Appearance → Customise to get started.
Site Identity
In the Site Identity Tab you can amend the following:
- Site Title – The name of your site
- Tagline – this will appear in the tab in your browser and is a short description of your site
- Site Icon / Favicon – This is the icon in the left corner of your tab. This should be square and at least 512 × 512 pixels
General Settings
Some general site-wide settings can be found in Appearance → Customise → Settings.
- Gutter – this allows you to increase/decrease the gutter down each side of the site.
- Back to Top button – toggle this on or off to allow the user to slide back to the top of the site. This displays once the user has scrolled down the page.
- Show Newsletter on Blog post? – Adding your newsletter code here will allow the newsletter/sign up on your Blog post pages.
General Styling
A range of styling options are available in: Appearance → Customise → Styling.
These include:
- Background – change the website background colour, or use a background image
- Preloader – Decide on the style and animation of your preloader, which shows when the site is loading
- Menu Styles – Edit the styles (colour, opacity, fonts etc) of your menu
- Footer Styles – Edit the styles (background colour, opacity etc) of your footer
- Font/Icon Colours – Change the site-wide font and icon colours here
- Button Colours – Change the appearance of the buttons here as well as the site-wide accent colour. The accent colour is a colour that is strongly associated with your brand and gives a little colour to your site.
- Borders & Overlays – Adjust the borders (eg around images and videos) and the overlays (eg when you hover over an image)
- Body Text Styles – Here you can update the text for the Body text of your website, including font size, weight and style.
- Sub Header Text Styles – Here you can update the text for the Sub Headers of your website, including font size, weight and style.
- Section Header Styles – Here you can update the text for the Section Headers of your website, including font size, weight and style.
- Import Additional Fonts – If none of the Google Fonts match your requirements, you can upload a custom font here
Fonts
Bandtheme allows you to change fonts on your site and uses the Google Fonts library to do this.
If you wish to use a custom font not included in Google Fonts navigate to Customiser > Styling > Import Additional Fonts. Here you can upload all the relevant files for up to 2 different font styles.
In some cases, fonts have mismatched character to line height sizing which results in an off-centre effect in some browsers, particularly noticeable with text inside buttons. To avoid this use a font with fixed vertical metrics or use an alternative font.
If you are trying to find a custom font from a picture or logo, WhatTheFont is a useful service.
Google Font not displaying correctly?
Make sure you have selected a valid font weight for your font selection – not all fonts come with all weights.
Custom Font not displaying correctly?
If using custom fonts – please upload all formats (.woff, .woff2, .ttf, .eot and .svg) for full browser support.
Animation
You can choose the section title and page animations if you navigate to Appearance → Customise → Animation.
- Title Animation – controls the animation of the section titles at the top of each pocket of content on your site
- Page Animation – controls the effect for the page transitions
Analytics
To add an analytics tracking code to your website, navigate to Appearance → Customise → Analytics.
Here you will find a text area where you can paste any relevant tracking code, which will then be added to your site.
Bandtheme allows three different options for adding tracking codes because, depending on the tracking code, you may need to add it to the site Header, Body or Footer. All three options are catered for, so paste your code into the relevant text area and click Publish.
We recommend using the Google Analytics which is a free powerful analytics service from Google.
Additional CSS
You can add some extra, custom CSS to your site by navigating to Appearance → Customise → Additional CSS.
Add your own CSS code here to customise the appearance and layout of your site. Learn more about CSS here.
This should only be performed if you have a good level of CSS knowledge as it will affect the styles on your site.
Menu
This section covers creating and editing the menu (or navigation) at the top of your website.
Creating a menu is optional. If you do not create a menu (or remove all items from an existing menu), ALL the sections on your page will be added by default.
To easily control which pockets appear in your menu, you will find a Hide From Menu? toggle under the Settings tab on each pocket to show/ hide each one as you wish. If you are using this option, you can skip the rest of this guide section.
If you wish to customise the menu with external links of have more advanced control, you can create a Custom Menu and Custom Links. This is covered more below.
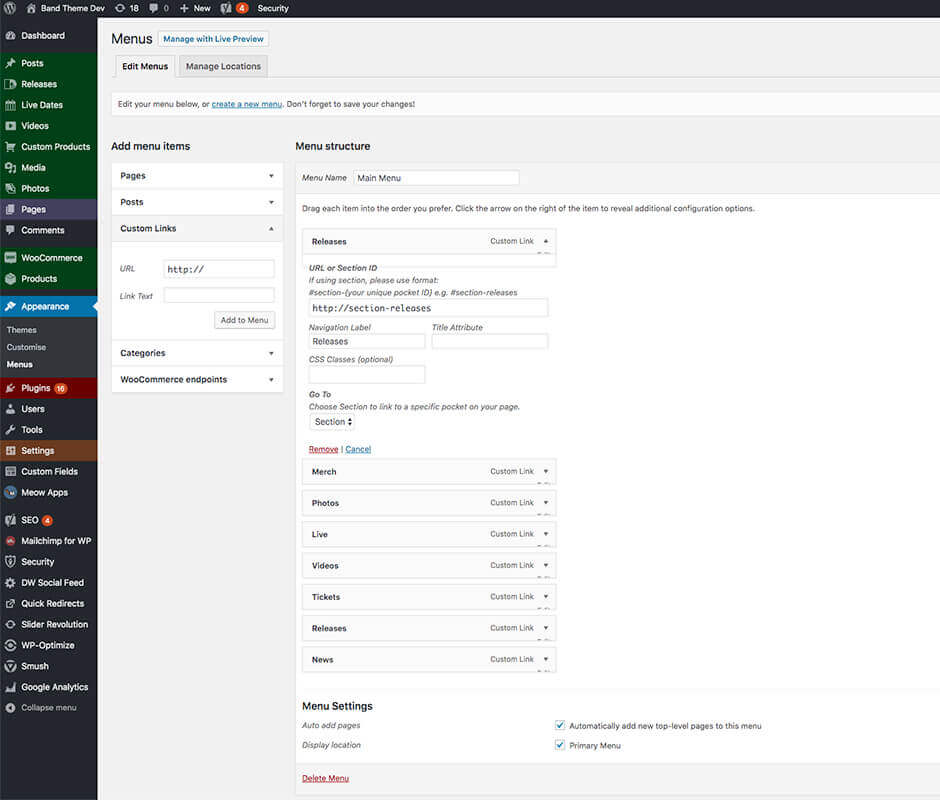
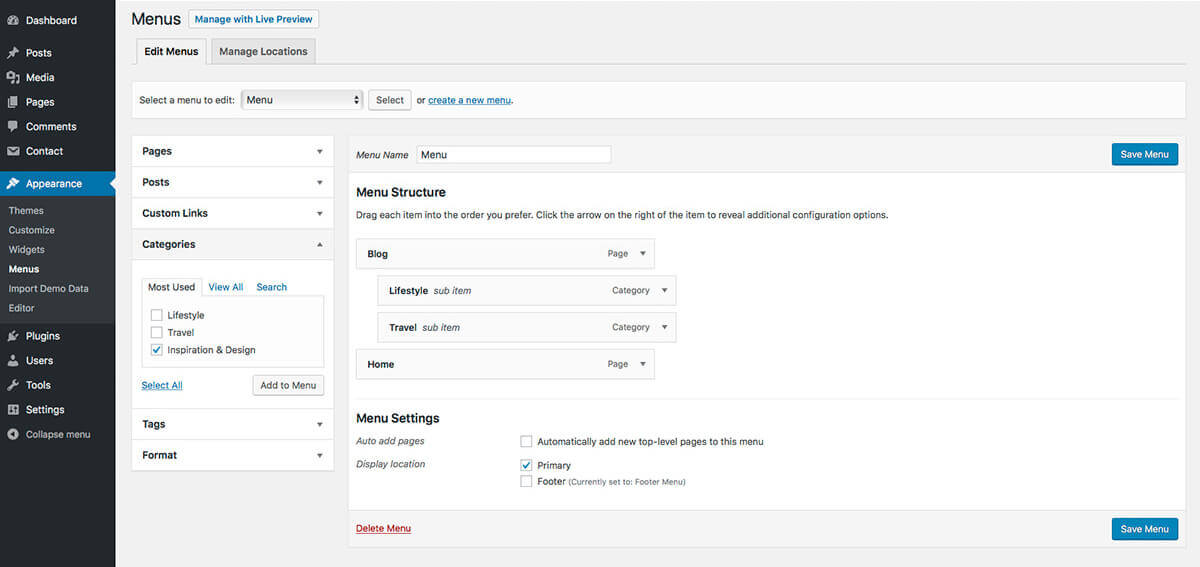
Creating The Menu
- In WordPress, navigate to Appearance → Menus
- Select an existing Menu or create a new Menu
- From the drop-downs on the left, choose the content for your menu
- Position menu items by dragging & dropping into the menu on the right
- Check the box to set the menu as Primary to make sure the navigation is added to the site
- Click Save Menu
Can’t see any menu items? Make sure you have your Front Page set and that at least one of your pages is set to Public i.e. not Draft or Private.
Adding Pages, Category Pages, Posts
On the left-hand side of this screen are a number of drop-down boxes titled ‘Pages’, ‘Categories’, ‘Posts’ and ‘Custom Links’. Each heading will list available items to add to your menu.
Check the box next to the page, category or post you would like to add to your menu and click Add to Menu. The selected item should now appear under “Menu Structure” column. Here, you can drag and drop the item you’ve added to adjust its location in the menu.
You can also create sub-menus by dragging and dropping a menu item underneath another and positioning it with an indent (see the image below for an illustration of this).
To add a custom link to your menu, select the ‘Custom Link’ drop-down menu. Enter the URL (eg #section-news) into the appropriate box and then add the Link Text (eg News).
Make sure you add a hash (#) in front of the URL in order to allow the menu item to slide the screen down to the relevant section of the website.
Custom Links
You can also set a custom link or ID in the respective content pocket (when editing your Page). This is especially useful if you have two pockets with similar content, i.e two Photos pockets. You can give them both a unique ID, which you can then use in your menu Custom Link.
Click Add to Menu and drag and drop the menu item into position.
Ensure that the ‘Go To’ option is set to Section and the page will slide to that section when a user clicks on the menu item in question.
If you are linking to a pocket, make sure the URL is added as # followed by the pocket id e.g. #section-id or #releases
If you are linking to an external website, make sure it starts with https:// and “Go To” is set to Page.
Make sure you add a hash (#) in front of the ID in order to allow the menu item to slide the screen down to the relevant section of the website.
Additional Menu Item Features
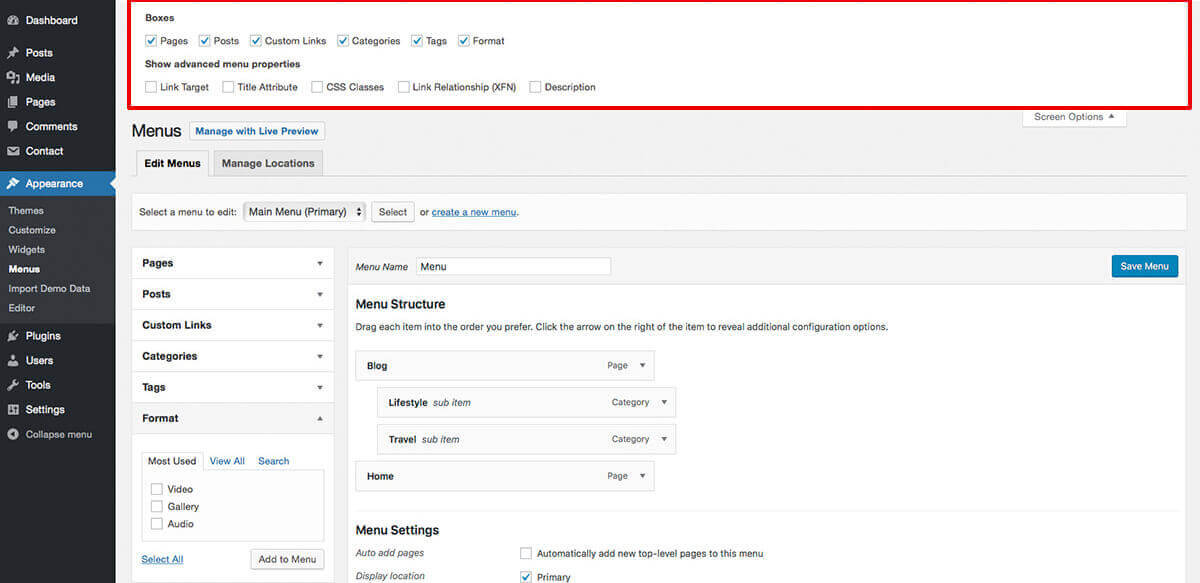
For additional menu features, click the Screen Options tab in the top-right corner of the Menu page. Here you can add the option of linking directly to a Post or specific Tag within your navigation menu. You can also check the box next to Link Target to give yourself the option of having menu items open in a new tab when clicked.
Pockets
Below is some detail on each of the content pockets and the different options within each pocket.
Each pocket is organised in to relevant tabs – please refer to Pocket Structure for more details on general structure or see below for details on each specific pocket.
All pockets will have come common fields and styling options. Specific options for each unique pocket are outlined below.
There is no limit on the number of pockets you add.
There is no restriction on the order they appear and they can easily be re-ordered by drag & drop!
All content is optimised to only load when scrolled into view so no need to worry about performance and page loading speeds.
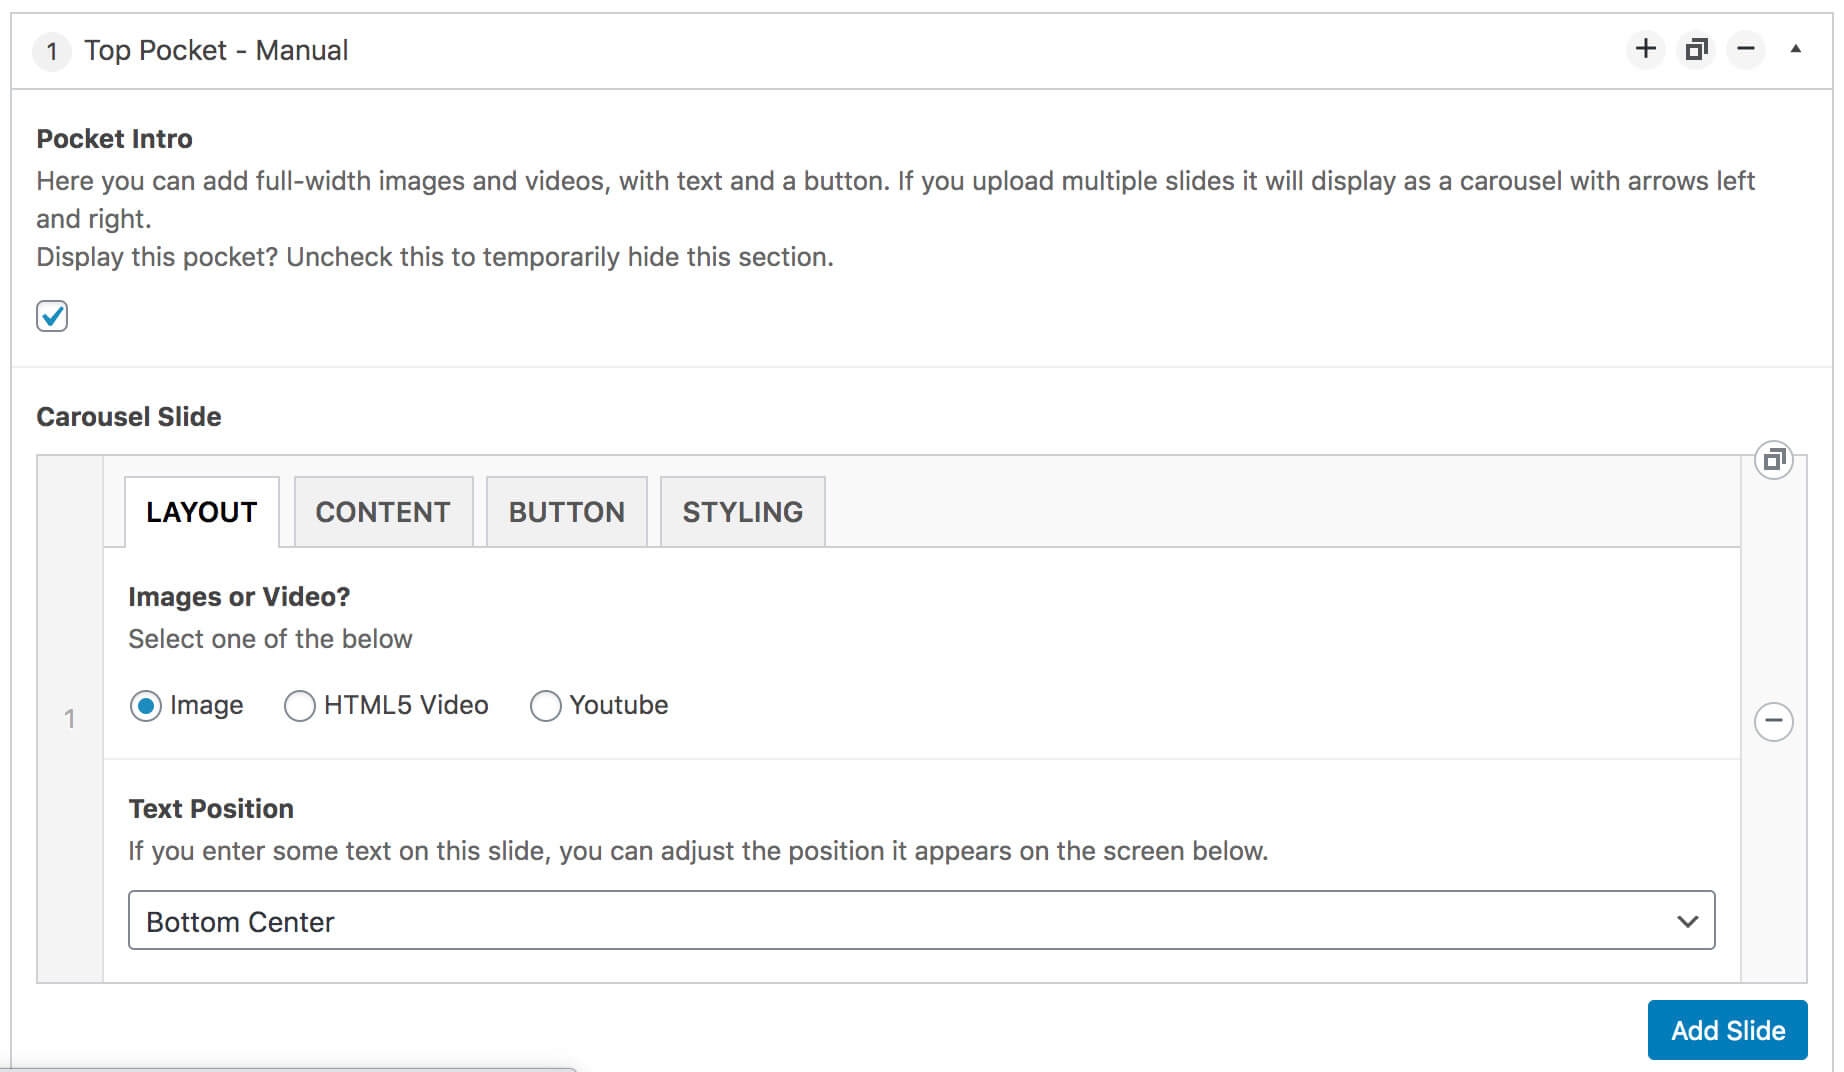
Top Pocket Manual
The Top Pocket is designed to be the first pocket of content that you see at the top of your website.
This can be a static image, and image slider or a video.
To create manual top pocket, go to your page and click to Add Content Pocket → Top Pocket – Manual.
STATIC IMAGE
To add a static image as your top pocket, select Image within the LAYOUT tab.
IMAGE SLIDER
If you a want an image slider you can add more carousel slides, by clicking Add Row. This will automatically create a slider on your website.
VIDEOS
You have two options in order to use a video in your top pocket – a HTML5 video, which you will need to upload to the site, or a YouTube video.
Once you have selected the layout to be images or videos, you can then customise the pocket, detailed below:
- CONTENT TAB – Add any images, videos or YouTube URLs
- BUTTON TAB – Add an optional button linking wither internally within your site, or externally
- STYLING TAB – Change the font colour, add a tint and set the tint opacity
We recommend hosting videos externally on YouTube. This way, the video will stream from YouTube and will keep the page loading quickly.
We recommend only adding multiple slides where necessary as this can cause an increase in page load times.
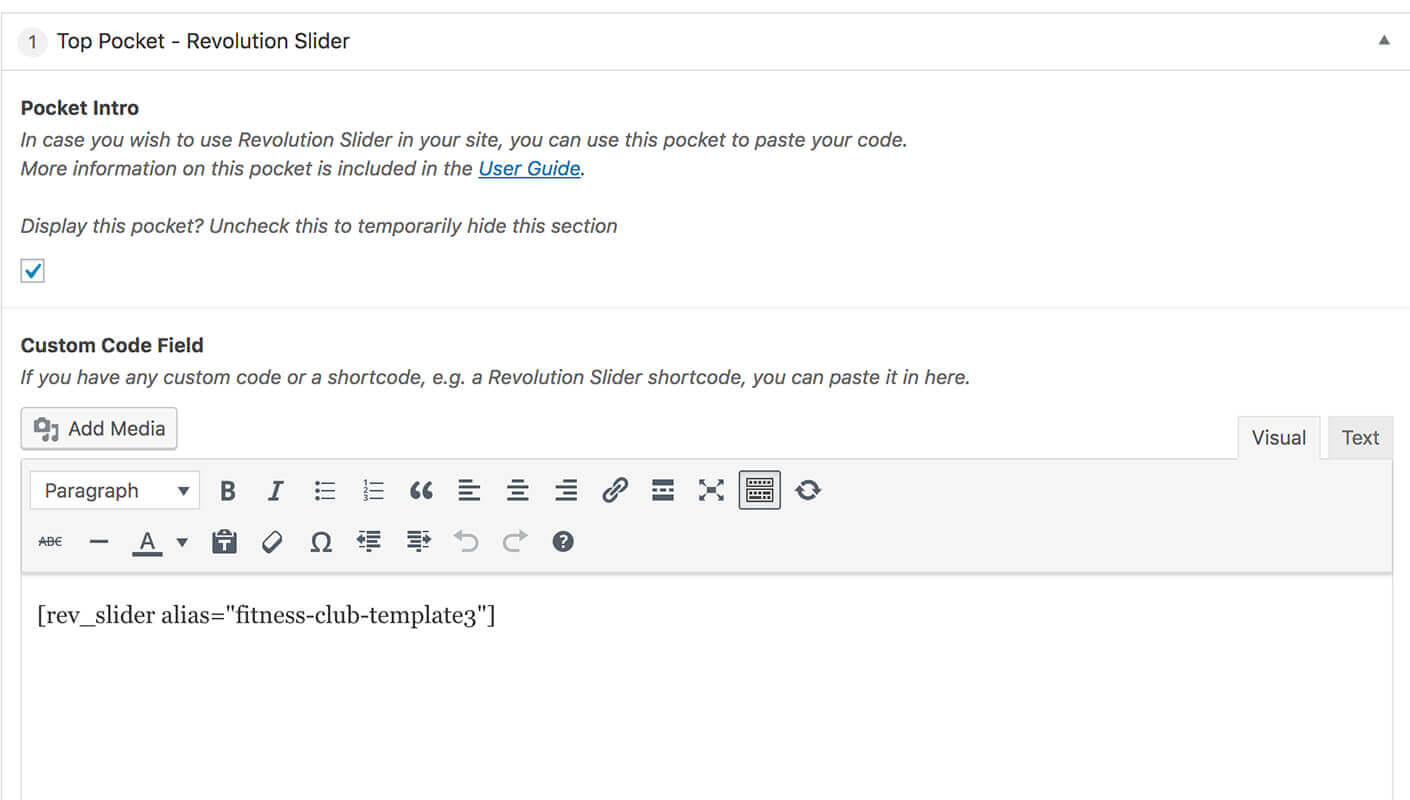
Top Pocket RevSlider
Another type of top pocket is the Top Pocket – Revolution Slider. This is for more experienced users and allows more to complex slides to be created using the WordPress plugin.
This is a powerful plugin with lots of features and some demos that you can import and then customise to suit your website.
Once you have saved your slider you will need to copy the slider shortcode and paste it into the Custom Code Field within your pocket.
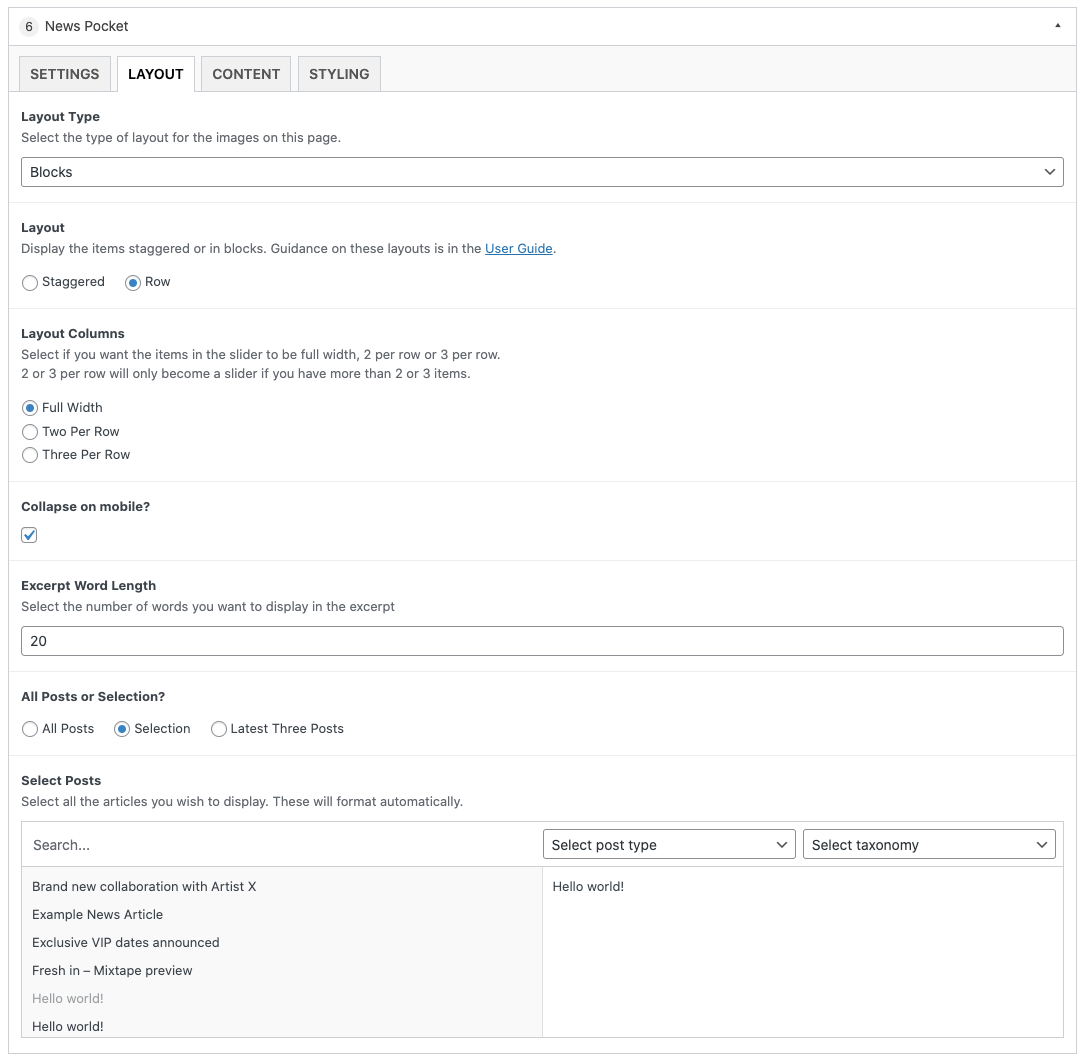
News Pocket
This pocket allows you to add a news section to your site, with a range of display options.
First you must add some News (or Blog) articles – please refer to Adding Blog Content for more details on this.
Within the news pocket you can customise how the articles are displayed. The main layout options are:
- Blocks (a bit like stacked bricks)
- Sliders (scrolling slides)
Within each of these, you can further customise to change how many appear at a time, pick the latest, or a set selection and more fine tuning options on what is displayed.
Release Pocket
The Release pocket will display release content added under Releases.
The pocket options allow you to customise the grid or slider layout and if the pocket includes a Spotify follow button or not.
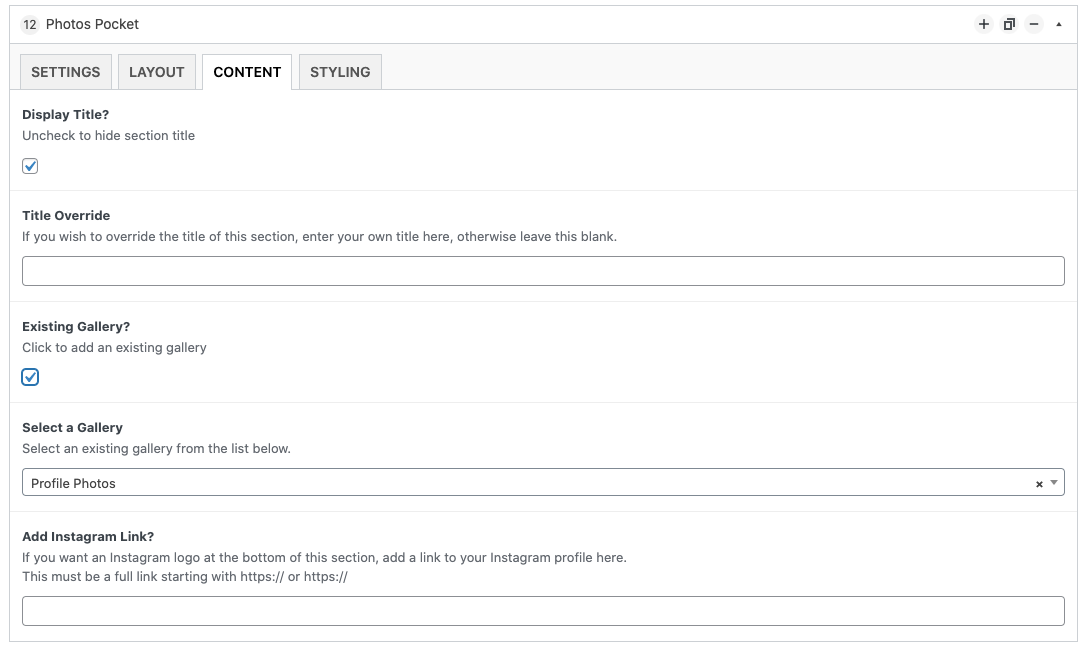
Photos Pocket
This pocket allows you to add a photos section to your site, with a range of display options.
You can either add a Gallery first or manually upload individual photos – please refer to Adding Photo Content for more details on this.
Layout options include:
- Blocks
- Sliders
Within those layouts you can customise how many photos are shown at a time and if you want to use an existing Gallery or manually upload new images. If you are uploading new images, you can re-order with drag & drop.
To add a link to your Instagram profile, fill in the Add Instagram Link field.
If you are looking to automatically pull in your Instagram photos, please use the Instagram Pocket.
Full Width Image Pocket
The full width image pocket is for adding a cosmetic visual element to the page – this can be useful for breaking up content, especially if you have a lot of text.
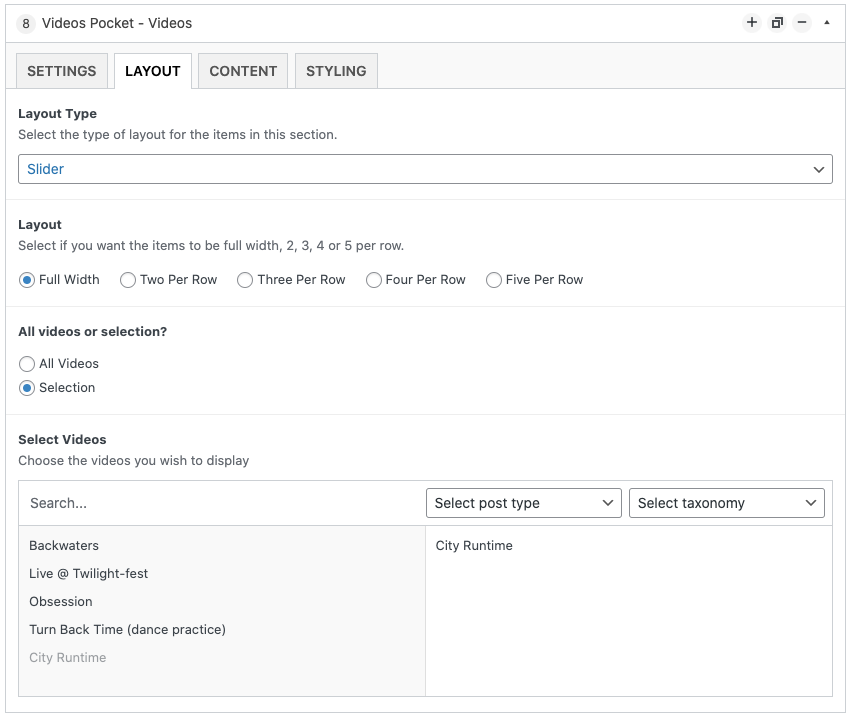
Videos Pocket
This pocket allows you to add a video section to your site, with a range of display options.
As per News and Releases, first you must add some Video content– please refer to Adding Video Content for more details on this.
Options available let you change layout and which videos are displayed.
It is also possible to add a YouTube subscribe button on the Content tab. You must enter your channel ID correctly e.g. the XXXXX part here: https://www.youtube.com/channel/XXXXX. For more help finding your channel ID, please refer here.
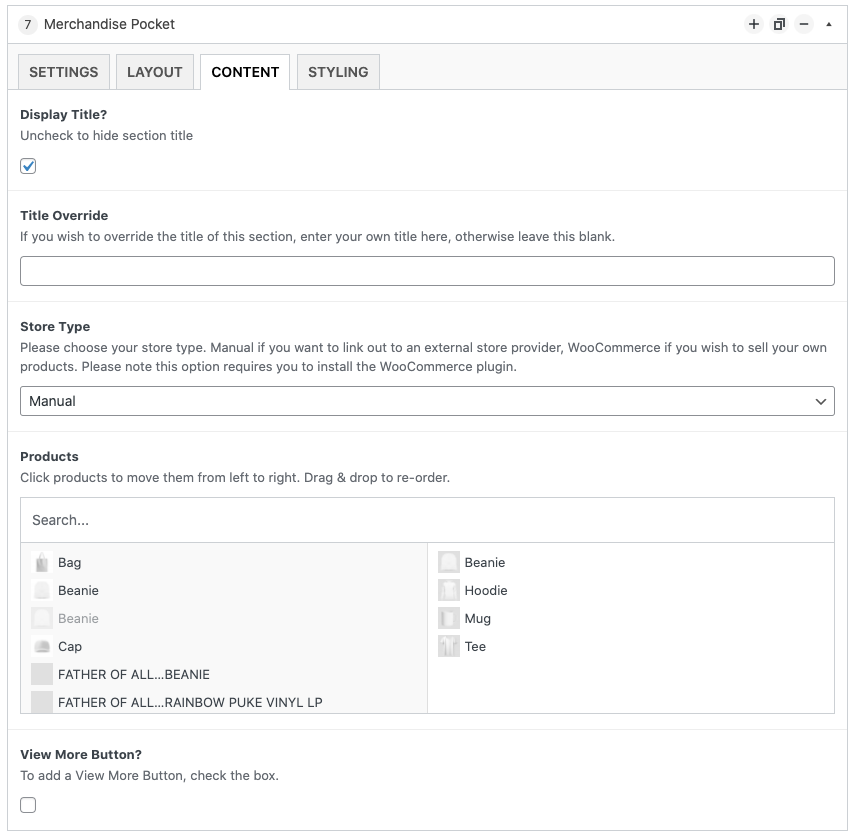
Merchandise Pocket
This pocket allows you to add a products section to your site, with a range of display options.
Products can either be:
- Manual (linked to an existing store such as Shopify, Amazon etc.)
- WooCommerce
Before you can add products you must add some in first – please refer to Adding Products for more details.
Text Pocket
The text pocket allows you to add a section in your site with some promotional text. There are a whole host of options to style your text to make it unique.
Options for this pocket include:
- Text with no image
- Text with image left
- Text with image right
- Text with image centre
There are options to add custom text, a button after the text, a background image, and a colour gradient.
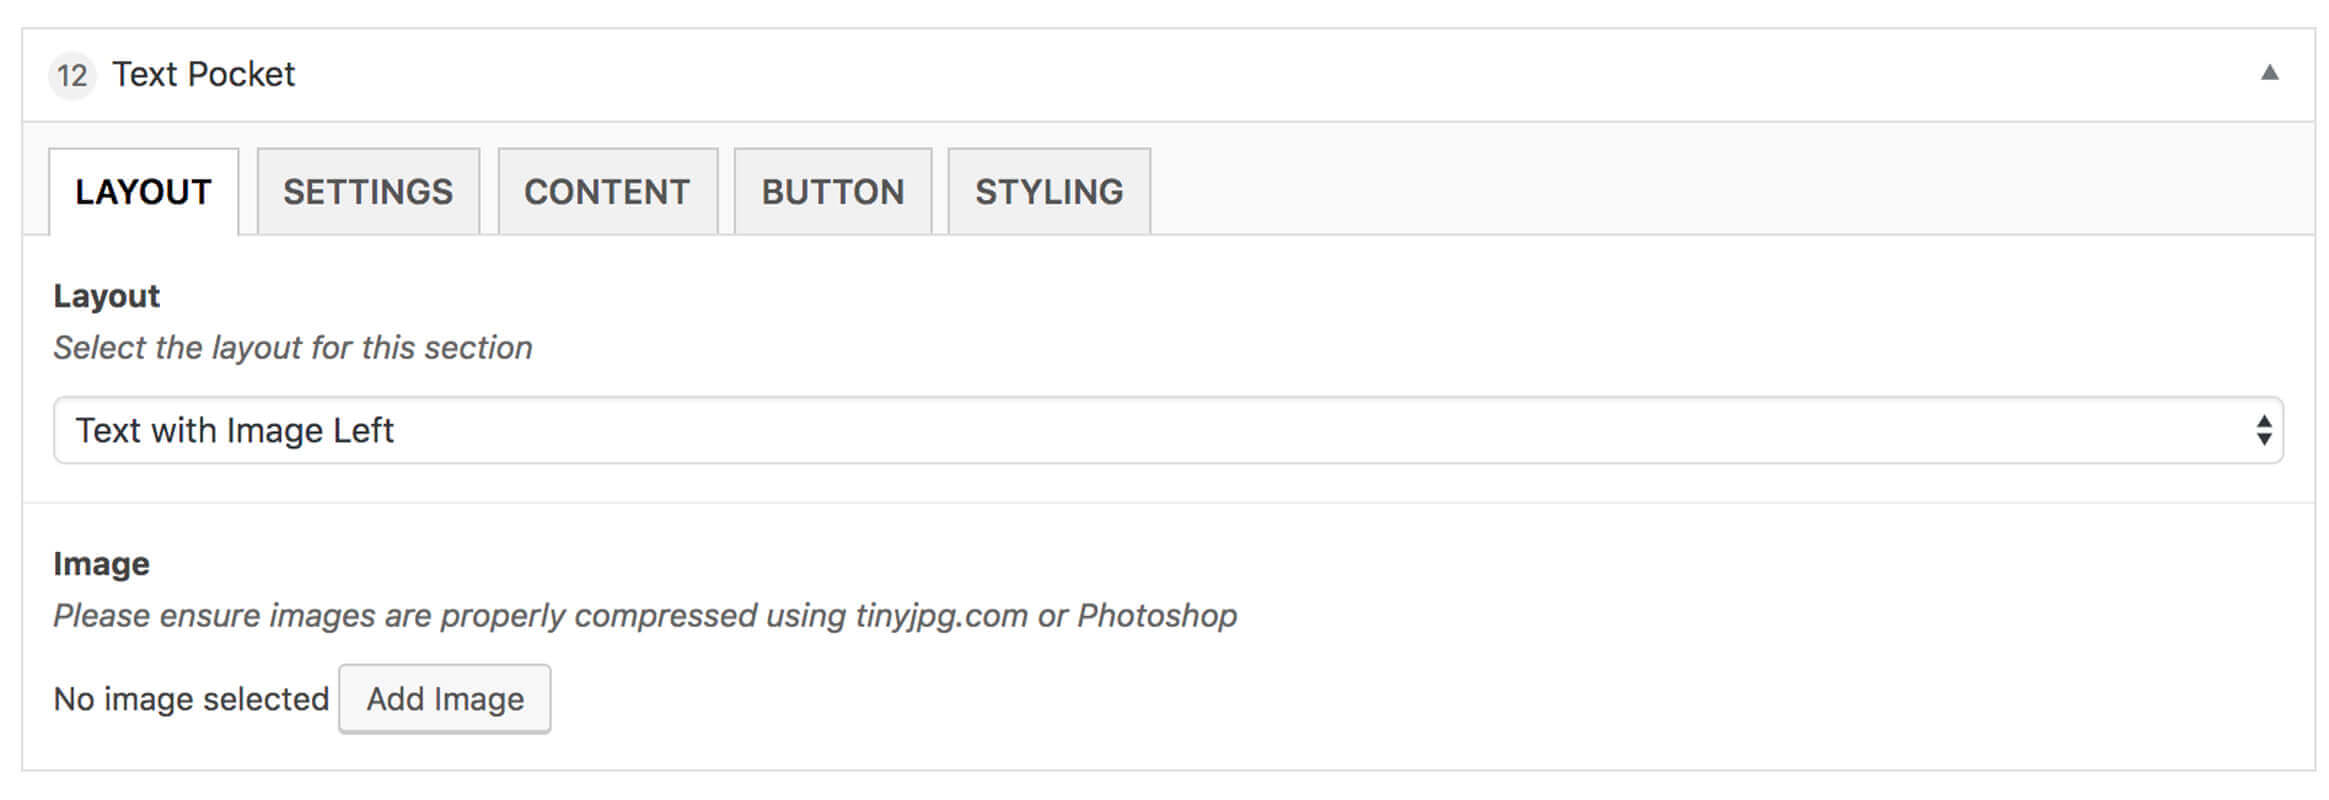
Get creative! Experienced users can insert HTML and embed code in to these pockets to allow for ultimate flexibility.
You can add a self-hosted audio file by simply uploading a MP3 file here, or pasting in the WordPress short code. While we recommend using a 3rd party streaming service due to hosting requirements and keeping your files secure, please see the official WordPress documentation for more details for more adding.
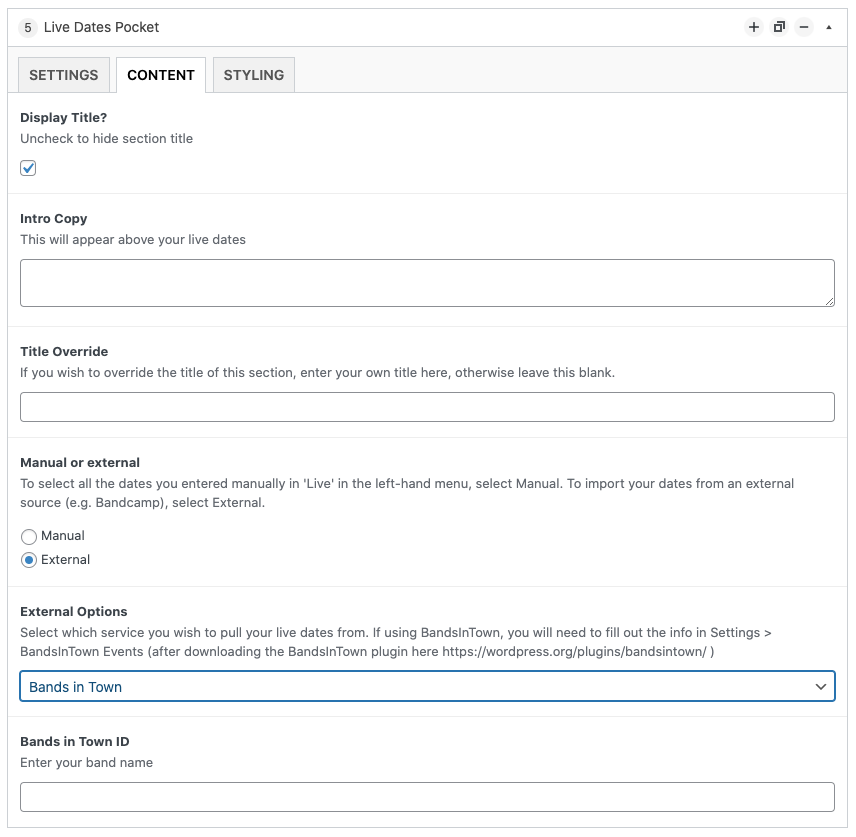
Live Dates Pocket
This pocket allows you to add an events section to your site, with a range of display options.
Events can either be:
- Manual (entered manually)
- External (pulled in automatically from Bands In Town or Songkick)
If you are using Manual events, first you must add some dates – please refer to Adding Live Content for more details.
If you are using External events you must first create an account with one of the supported providers. To use Bands In Town, you must also have installed the official plugin.
To use Songkick, watch this video for help finding your embed code.
Music Player Pocket
This pocket will display an embed or iframe from your preferred streaming service.
Simply retrieve an embed or iFrame and paste it into the Music Player iFrame field within the Music Player pocket.
Different streaming services have different methods of getting an iframe or embed.
Here are some useful links on where to find your code for common providers:
There are options to add custom styles to the pocket in the STYLING tab.
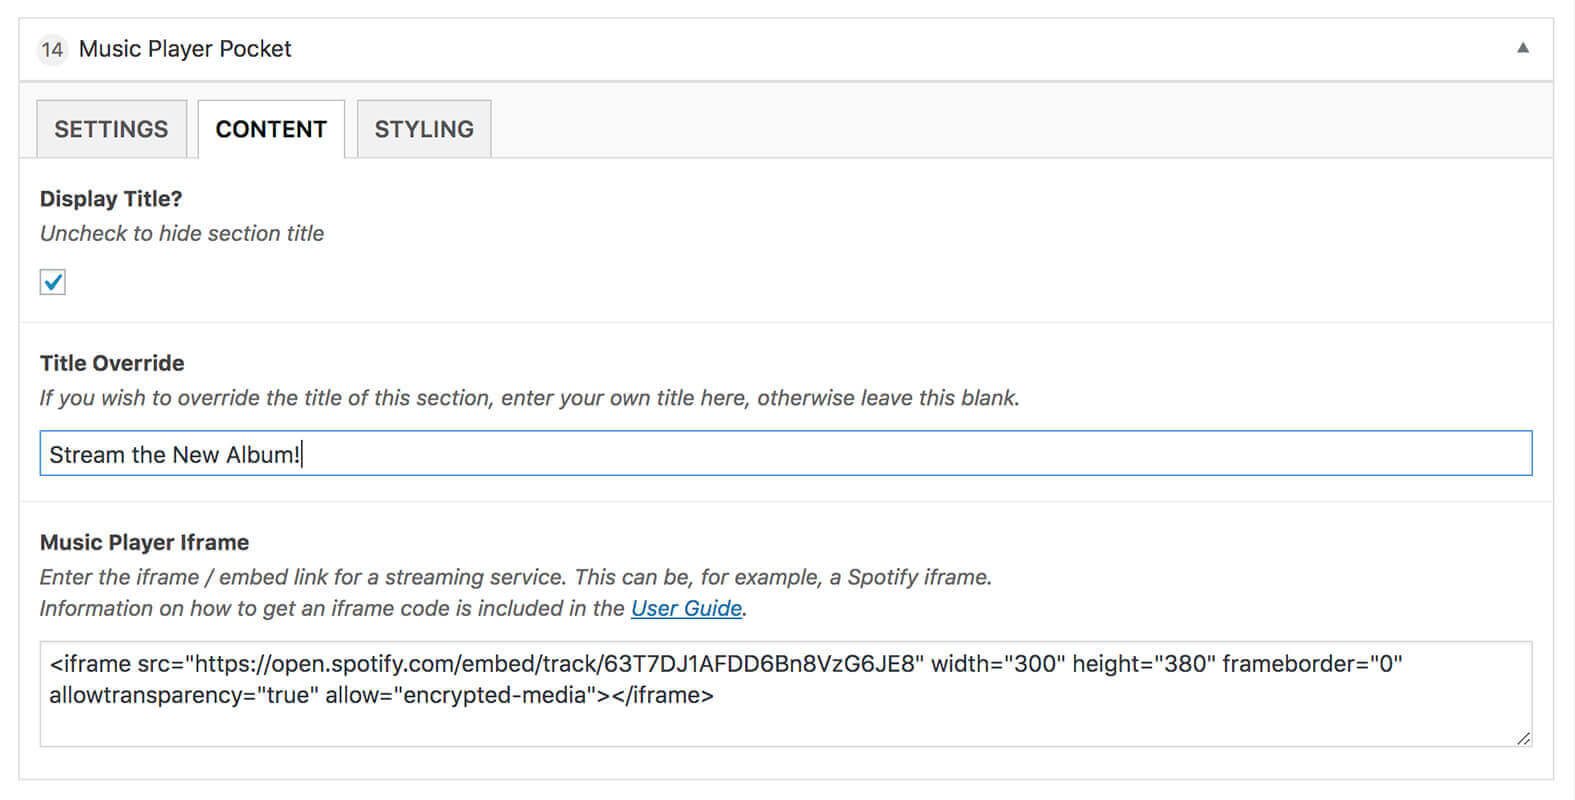
Looking to add a self-hosted audio player? Please see refer to the Text Pocket.
Newsletter Pocket
For the Newsletter pocket, Bandtheme allows you to paste code into the Sign Up Form field within the pocket.
In the example below you can see that the code has been generated as part of a MailChimp newsletter. MailChimp is easy to use and very effective but you can also enter the sign-up code of your chosen provider into the pocket.
There are no restrictions – you can use embed code from any provider here. More experienced developers may also want to use a more advanced plugin like Gravity Forms.
There are options to add custom styles to the pocket in the STYLING tab.
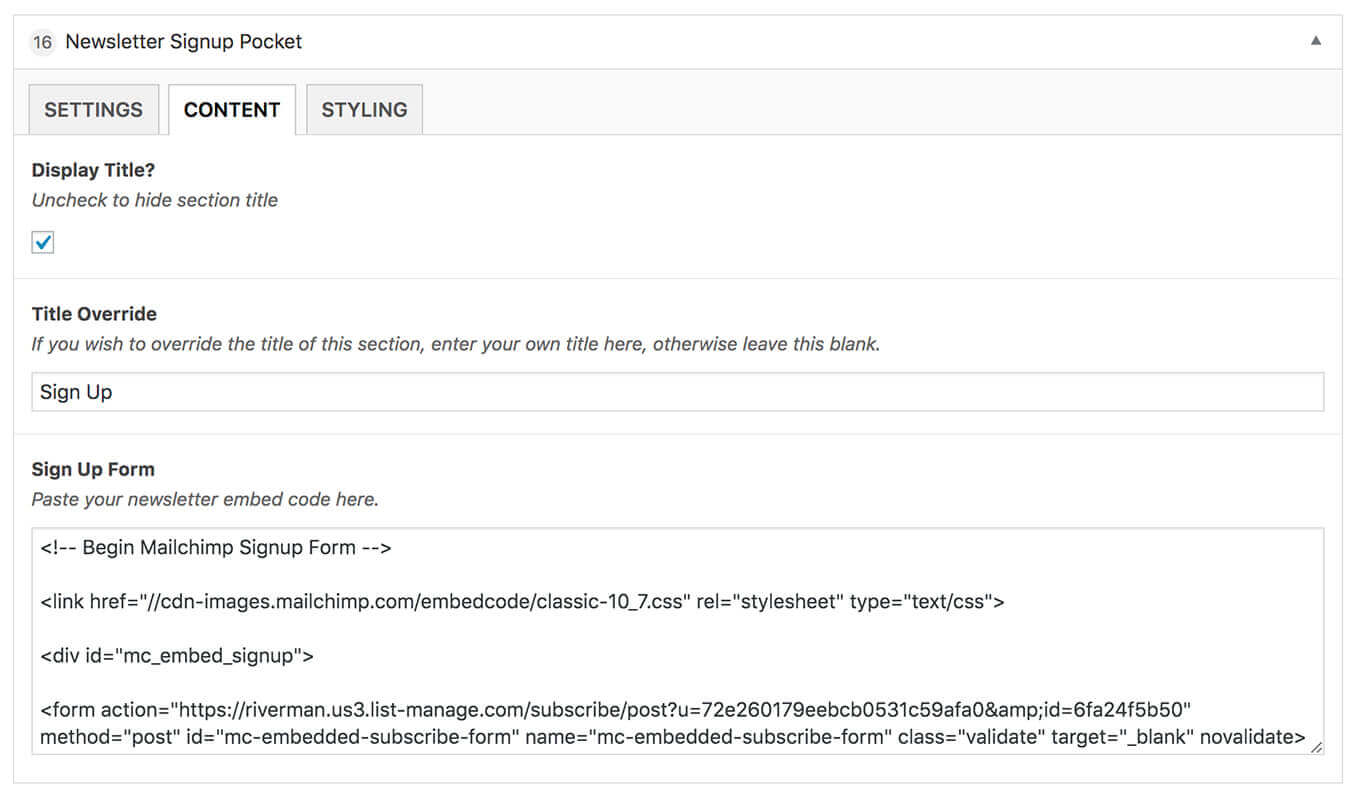
Please note that you may be pasting in styles from your form provider which override Bandtheme so make sure to test and check what you’re adding!
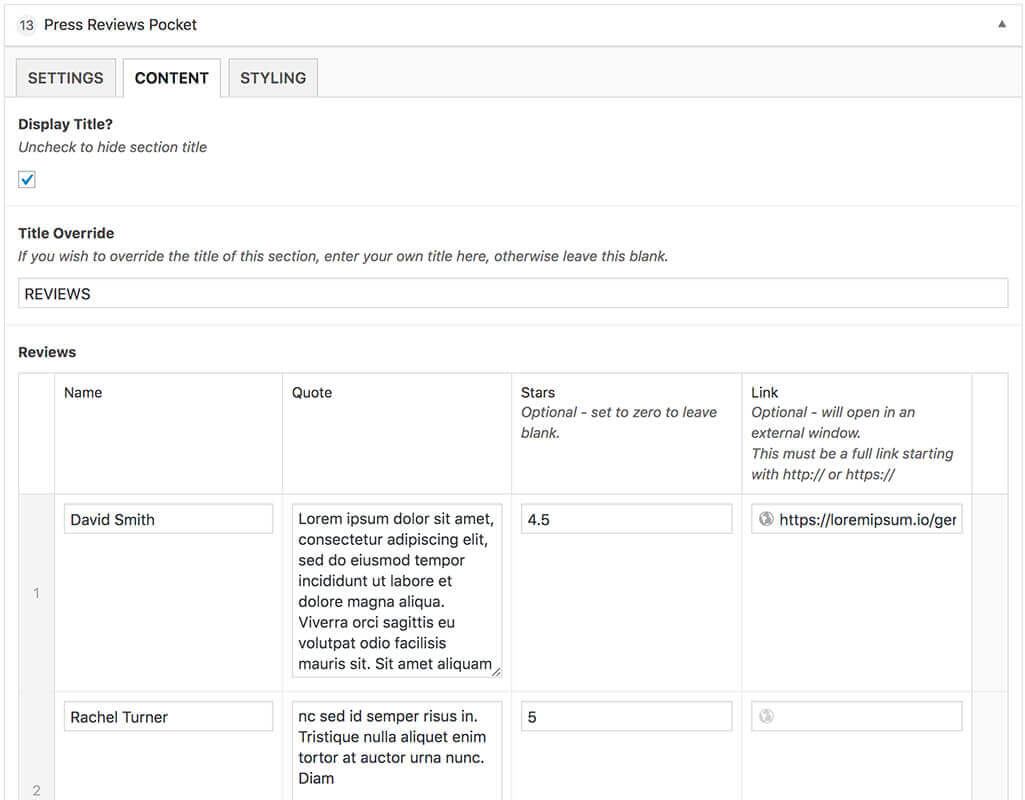
Press Review Pocket
This pocket allows you to add reviews, quotes or testimonials to your site. You can add as many as you like by navigating to the Press Reviews pocket and clicking the CONTENT tab. Details for each review include:
- Name
- Quote
- Stars – choose the star rating (up to 5)
- Link – Optional but can link to a website or review
There are options to add custom styles to the pocket in the STYLING tab.
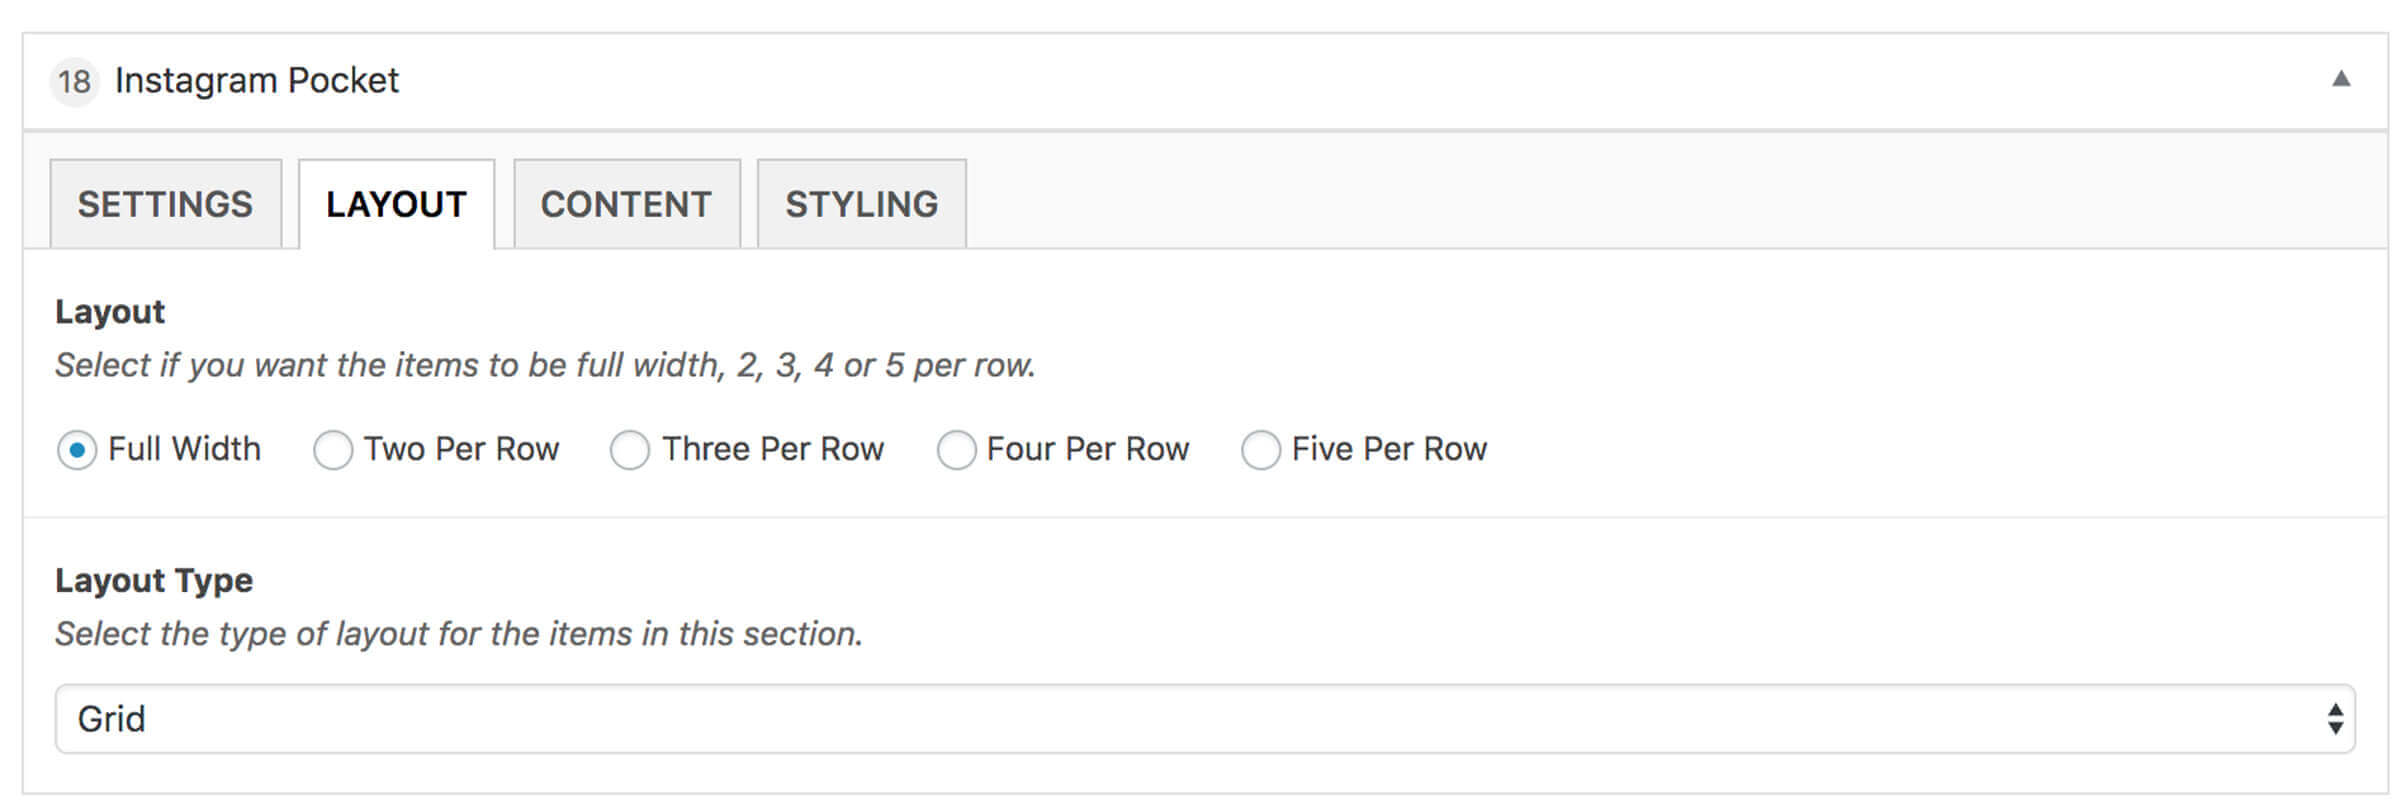
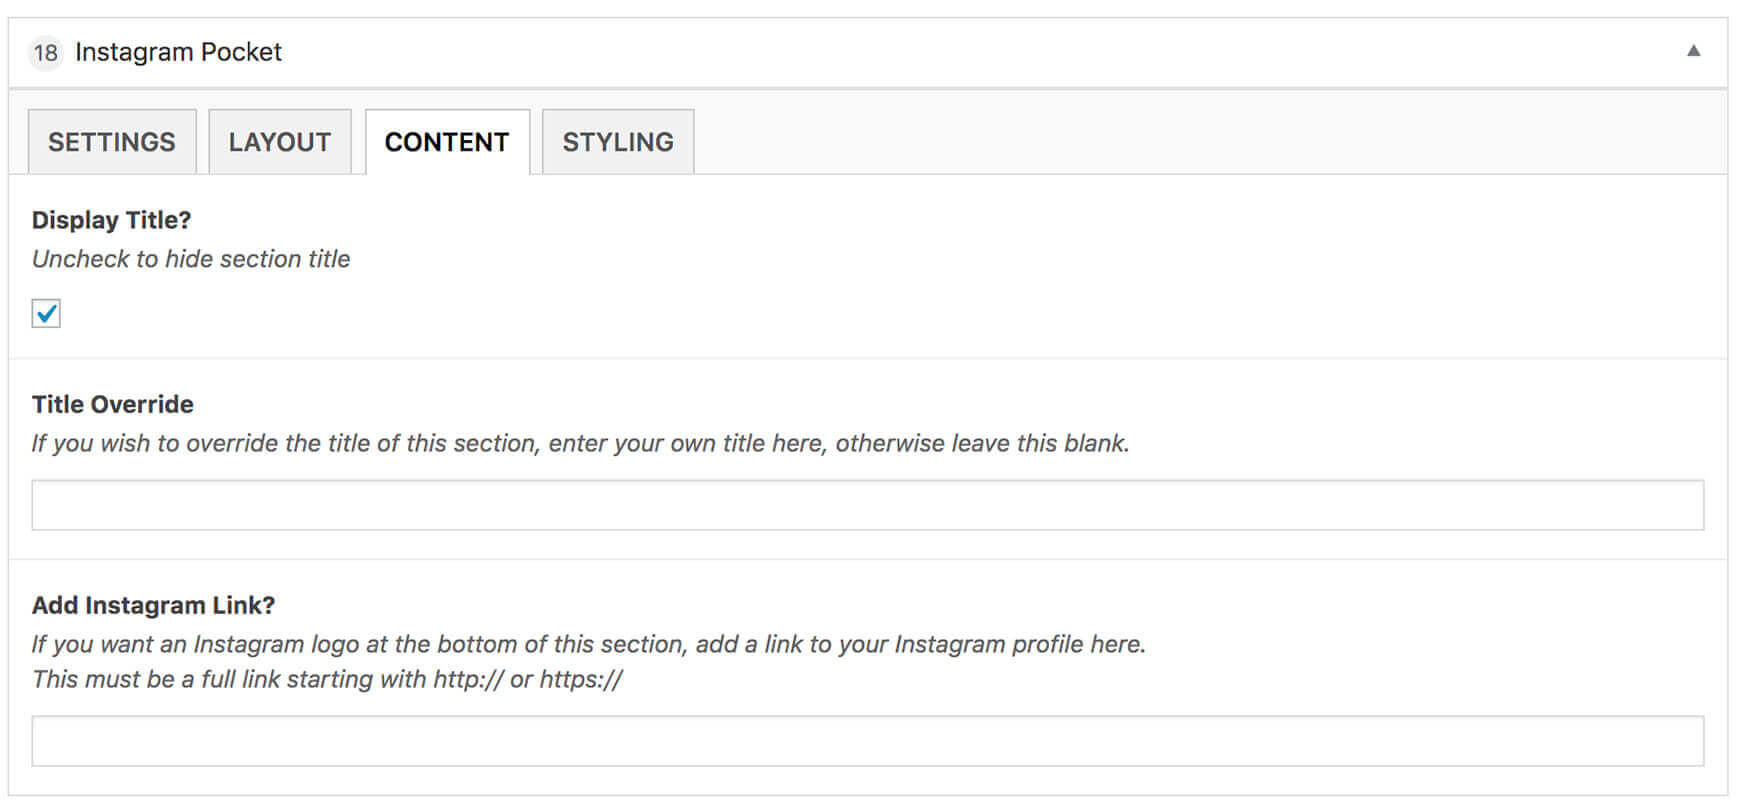
Instagram Pocket
The Instagram pocket allows you to display a pocket containing your latest Instagram posts in a similar format to the Photos pocket.
You can display your posts in a grid or a slider and decide how many images to show on each row.
There are options to add custom styles to the pocket in the STYLING tab.
ADDING AN INSTAGRAM LINK
You also have the option to add a link to your Instagram profile at the bottom of the pocket, which will display as an Instagram logo. In order to add the link, navigate to the CONTENT tab of your Instagram pocket and add a link to your Instagram profile in the “Add Instagram Link?” text area.
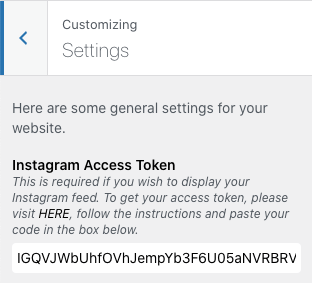
ADDING YOUR INSTAGRAM TOKEN
In order for Bandtheme to pull your latest Instagram posts into your Instagram pocket, you need to access an “Instagram Access token“.
To get your access token, please ensure you are logged in to Instagram (make sure you’re using the correct account!).
Then click HERE to use our handy Bandtheme tool and follow the instructions to login to your account.
Once you have your token, in the WordPress Dashboard, navigate to Appearance → Customise → Settings.
Then paste your code into the Instagram Access Token text area.
NOTE: Private Instagram accounts are no longer supported for this function.
No images showing?
Make sure you are using the latest version of Bandtheme. Also if you have changed your Instagram password recently, you may need to re-authenticate and add a new Access Token.
If you are using a cache plugin, please also make sure you clear your cache.
If you have updated your token and have cleared your cache but you are seeing the wrong images e.g. from a demo import, you may need to refresh your WordPress transients.
Promo Pocket
This pocket allows you to add a promo image to your site, which can link externally if required.
Options for this pocket include adding an image and some text as a means of promoting a new album, gig or event.
Get creative! The promo pocket can be a powerful tool and you can use multiple promo pockets on your site. Use it to help push sales or promote a new release at key times. You can always toggle the visibility on and off if you want to save it for later!
8. Optional Extras
This section is optional, but may be useful to many users.
Privacy
Privacy is an important part of modern websites. By default Bandtheme will not collect any user data. However, if you add newsletter collection, contact plugins or even anonymous analytics, it is important that you comply with local laws and data collection policies in your country.
If you import one of the Bandtheme demos you will have a basic Privacy Policy and Cookie Policy Page. It is important to update these so they are relevant to you.
WordPress also comes with default tools for managing data. More information can be found here.
You may find these resources useful:
- Cookie Consent Plugin
- WordPress Cookie Policy example
- WordPress Privacy Policy example
WooCommerce
Bandtheme is configured to work with WooCommerce, if required. To enable WooCommerce on your site navigate to Plugins → Add New and then install and activate WooCommerce.
You can also find documentation for WooCommerce on: WooCommerce Documentation.
Video Tutorials: WooCommerce Video Tutorials – Scroll down to “Installing WooCommerce” and select a tutorial.
If you are setting up a store, the first step is to install and activate the WooCommerce plugin. (See also: Plugin Installation).
We recommend using the WooCommerce Setup Wizard after activating the plugin in order to run through the basic setup.
If you are not familiar with WooCommerce, the plugin documentation is available here: WooCommerce Settings
There are many payment gateway options with WooCommerce to suite all needs. You can find a full list here.
Shopify
Shopify is a very popular store solution.
Shopify can easily be used with Bandtheme. Simply use the Merchandise pocket, select Manual Products and enter the links to your existing store items.
Maintenance Mode
If you wish to have a maintenance mode holding page on your site we recommend using the WP Maintenance Mode plugin.
Once installed and activated, this plugin allows you to display a message or countdown on a holding page on your site until you wish to go live. It has many options which can be found (once activated) by navigating to Settings → WP Maintenance Mode.
If you are logged in to WordPress on your site, the maintenance page will not display but it will be visible to anyone not logged in. This enables you to edit your site in private.
Load your website in incognito mode, or log out of WordPress to view the maintenance page.
New Pages
Follow the steps below to create a page for your website and add content to your page.
You can add as many pages to your site as you like, and add as many pockets as you like to each page.
Don’t forget to check your menu is correctly configured if you’re switching between a “single pager” or multi-page site.
If you have imported a demo, all the pages you will need will have been created for you already!
Creating Pages
To create a page, navigate to Pages → Add New (In the left-hand WordPress admin menu).
This will be the main area for all the pockets of content on your site.
You can also add any other pages such as Privacy Policy or Terms & Conditions. If you add a Terms page, make sure you change the Page Template to ‘Terms / Conditions / Privacy’ on the right-hand side. If you have imported a demo, this will be done for you automatically.
Click here for details on how to add pockets of content to your pages.
Here you can enter a page title, add content and assign a Featured image.
In order to edit the page name in the browser tab, you will need to use the Yoast plugin.
Don’t forget to hit UPDATE (the blue button on the right of your WordPress admin screen) when you are done editing!
Page Templates
While editing a page, you have the option to choose between a number of page templates via the drop-down menu on the right titled “Template” (found in the Page Attributes box).
If you have imported a demo, these will all be set for you.
The templates available are:
- Default Template (for main pages)
- Terms / Conditions / Privacy (for these pages)
9. Pre-flight checklist
Ready to rock? Here are a few things you should always double check before going live!
 GDPR.
GDPR.
Privacy is an important part of modern websites. Refer to the detail here for more information.
Optimize your SEO.
Refer to the details here and check out the Yoast website for more details. Google (and your visitors) will thank you for it later!
Clean Up.
Make sure you remove any ‘back up’ pages you may have from importing more than one theme demo.
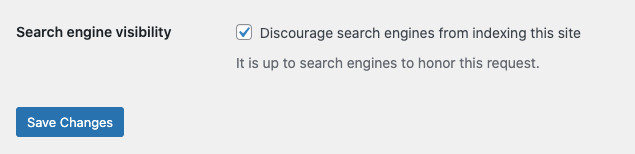
Make sure you check Search Engines can “see” your new site.
Click Settings → Reading → Search engine visibility and make sure this is not discouraged.
10. Going Live
The most exciting part of your Bandtheme journey – unleashing your website on the world!
If you have set up your site on a live site, there is nothing left to do. If you have set up a staging site you will need to move it to live.
Plan ahead! It can take up to 72 hours for a domain to propagate so make sure you plan accordingly.
If you have purchased our hosting package, we will help you get everything live!
Updating your DNS
If you have purchased a domain name and not already pointed it at your new website, you will need to log in to your domain provider and update your DNS record.
If you have purchased a hosting package with Bandtheme, please set your DNS to point to:
185.53.56.90
If you have purchased hosting with Bandtheme, once your DNS has updated, please raise a support ticket in your account area and we can connect your domain.
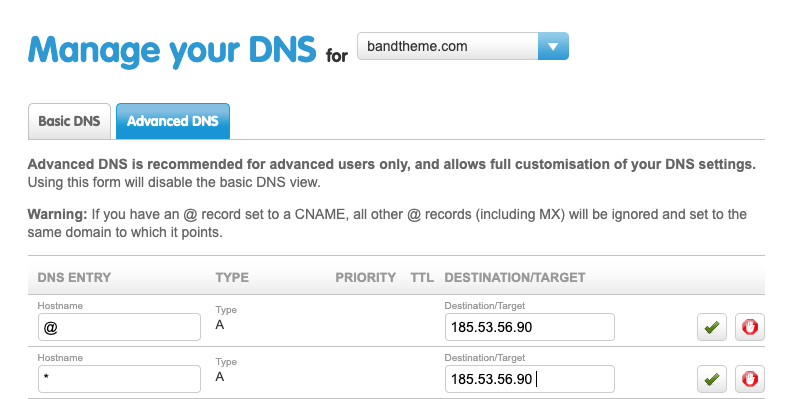
You will need to add two A-Records for * and @ values. Don’t forget to check your site works with and without www at the start!
Not seeing your new site yet? Please be aware it can take up to 78hours to propagate worldwide depending on your provider so make sure you plan your go live times accordingly!
11. Tips
SEO
Search Engine Optimisation (SEO) is the practice of optimising your website for search engines such as Google.
In order to do this in a simple and effective way, we advise using the WordPress plugin called Yoast. A useful article with further information on SEO is here.
Most search engines will automatically “crawl” and index your website but you can take more control over this by submitting your site to Google Search Console.
SEO On Pages and Posts
Once you have installed and activated the Yoast plugin, you will be prompted to follow the set-up wizard. This will add all the basic SEO information to your site.
On each page and post, Yoast will add a section at the bottom where you can edit your keywords, meta tags and much more.
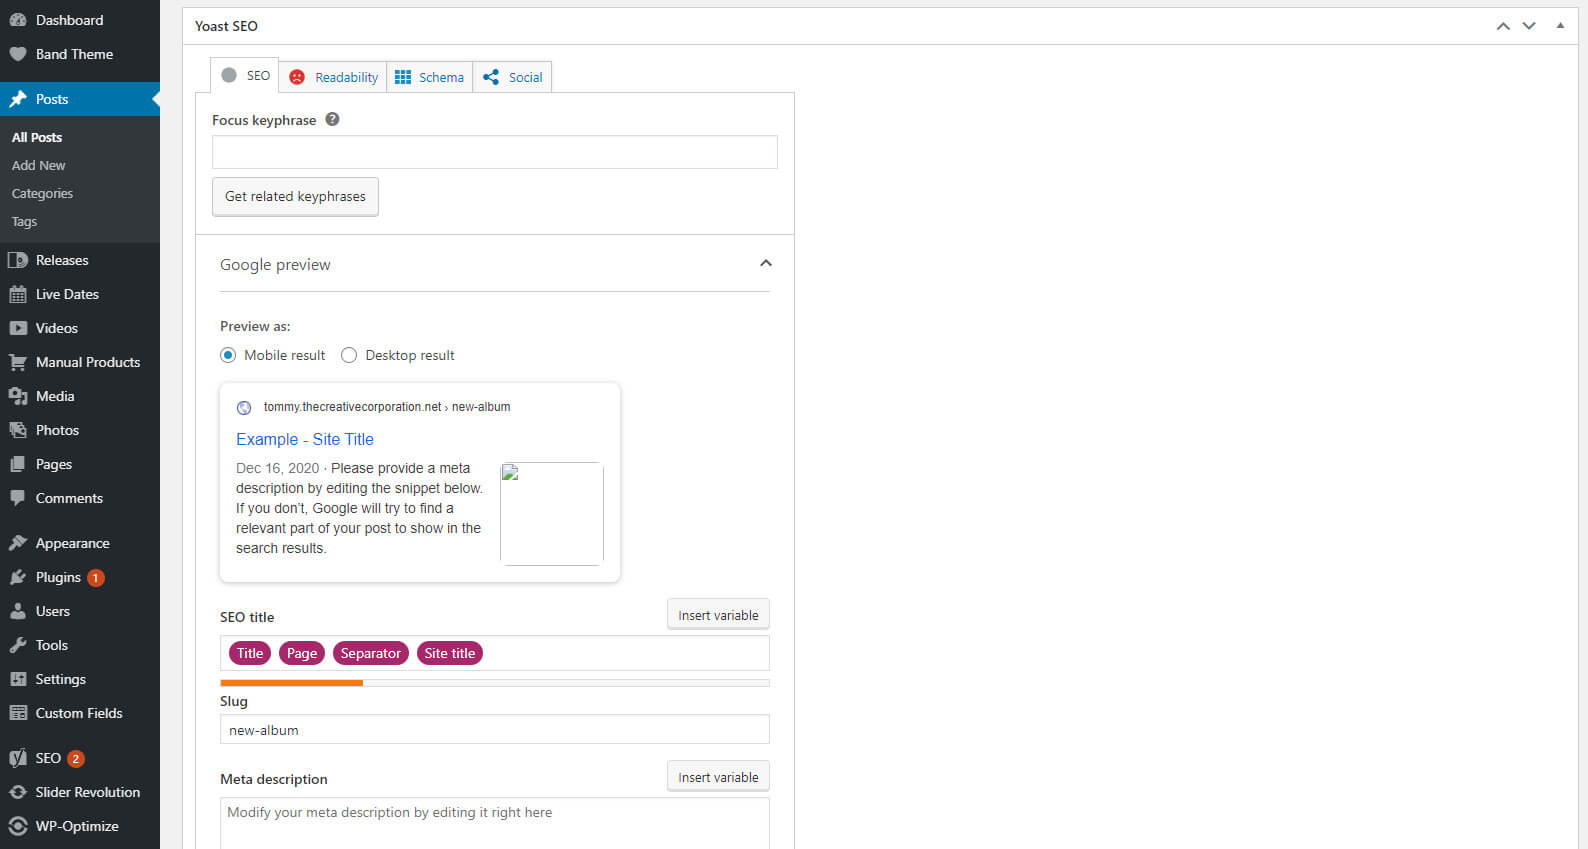
To change your site title (the text that appears in the browser tab) – edit the SEO Title in Yoast.
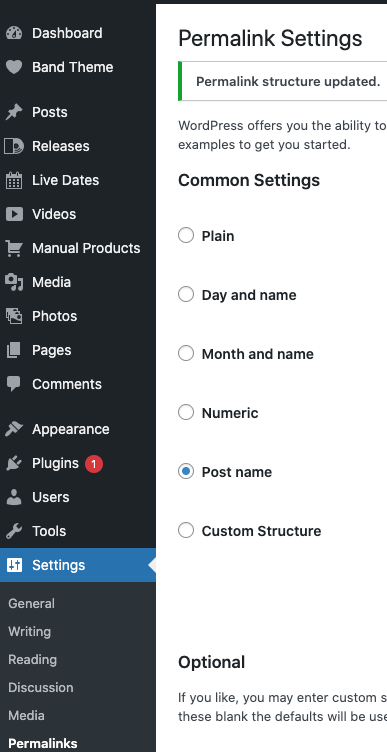
Permalinks
Permalinks are the technical term for the way your links are displayed in the address bar. By default you may not have “pretty” URLs enabled. Changing this is optional.
If you wish to change the way links are displayed, click Settings → Permalinks.
Changing to “Post name” is the most common.
Analytics
Don’t forget adding Analytics can be useful to see how your website is performing.
If you are looking to add tracking such as Google Analytics or Facebook pixels, please see the Analytics section.
Media
Before uploading any images to Bandtheme, please ensure they are properly compressed. This reduces the file size and will help your site’s load times whilst decreasing the pressure on your server.
We recommend two methods for compressing images.
- Photoshop – When saving an image, click the ‘Save for Web’ option
- Ting JPG (tinyjpg.com) – This site allows you to upload an image for compressing and then download the compressed image. It is extremely easy and fast, and is ideal for those with less knowledge of Photoshop
Don’t forget to name your file something ‘sensible’ and relevant before you upload it. Search engines can help use these to find your website!
For example: ‘my-band-name.jpg’ is much more useful than ‘untitled.jpg’.
Newsletter
Subscribe to our newsletter for more tips, tricks and advice!
12. Support
Thank you for purchasing Bandtheme.
If you have any questions please visit our FAQ and Knowledgebase.
If you need to raise a support ticket, please visit My Account → My Support Tickets.
Please note you must have an active license to be able to access support.
We are based in London and our regular office hours are 9am to 5pm (GMT). We normally answer support requests within 24-36 hours.
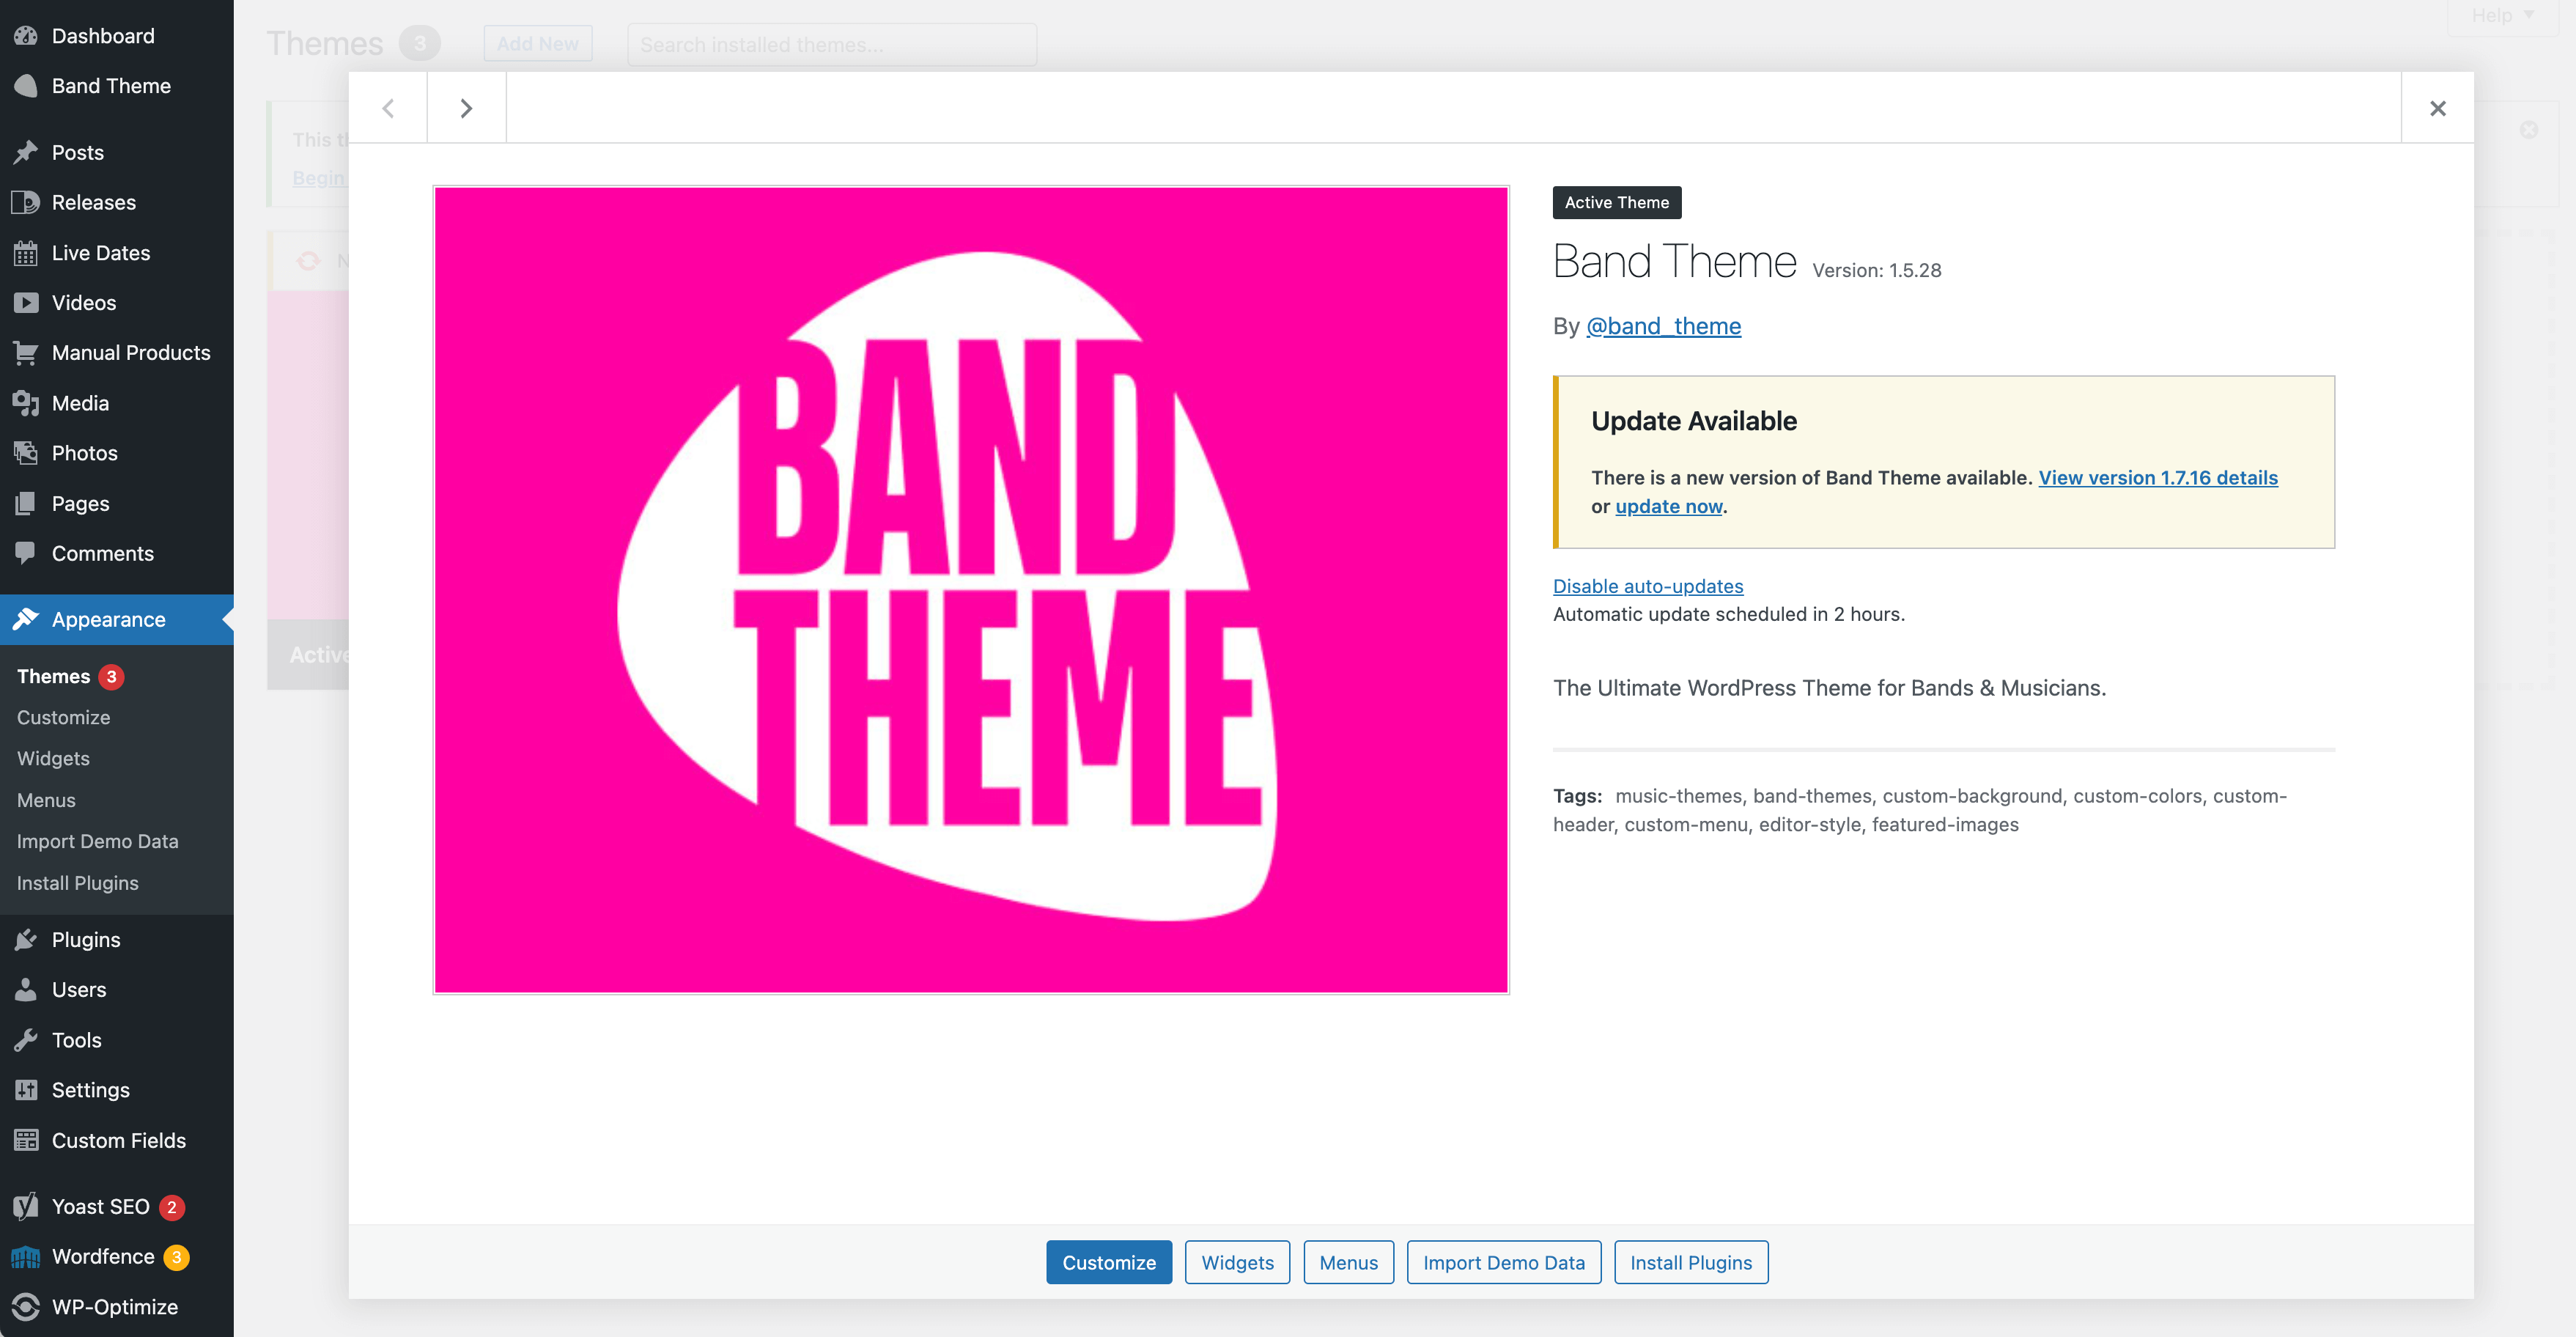
Theme Updates
We will periodically release updates to Bandtheme with enhanced features, fixes and security updates. Therefore keeping your theme up to date is always advised. You will not receive updates without a valid license.
Your site content will not change, only your theme files. For this reason, we always suggest making any code edits to a child theme.
Before you update Bandtheme to the latest version however, you should perform a backup of your site. Then, follow these steps to update your theme:
- Log in to your WordPress Dashboard
- Navigate to Appearance → Themes. (In the left-hand WordPress admin menu)
- If an update has been released, you will see ‘Update Available’
- Click the ‘Update Now’ link
The latest version of Bandtheme will now upload to your site.
We always recommend taking a backup of your site before making edits or updating anything – just in case!
Not seeing updates? Make sure you have an active license. New releases can take up to 48 hours to appear. If you want to force update, either download from your account area or in your site admin click Bandtheme → Check for Updates.
Auto Updating Bandtheme
If you wish to automatically update the latest version of Bandtheme you can switch this on next time there is a new release.
Navigate to Appearance → Themes → Bandtheme Theme Details → click Enable Auto-Updates.
You will continue to receive updates as long as you have an active license.
Knowledge Base
The knowledge base can be found here for more general Bandtheme and Account related questions.
And Finally
We hope you enjoy using Bandtheme.
We love to see how our customers have used Bandtheme – we may even feature your website in our Showcase.
Socials Pocket
This pocket allows you to add social media logos and links.
You can choose to use the same social media links if you entered some in the Customiser (details here), or you can enter different social media links here.